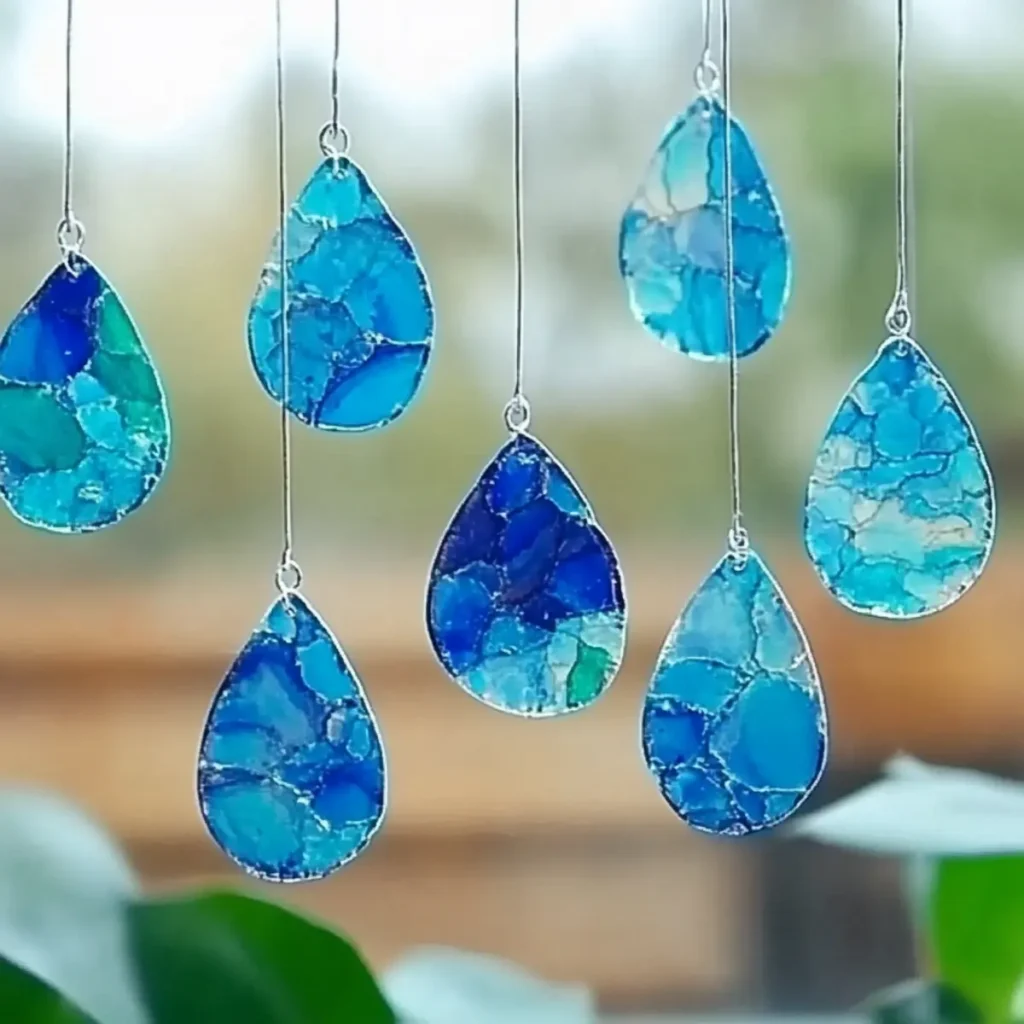
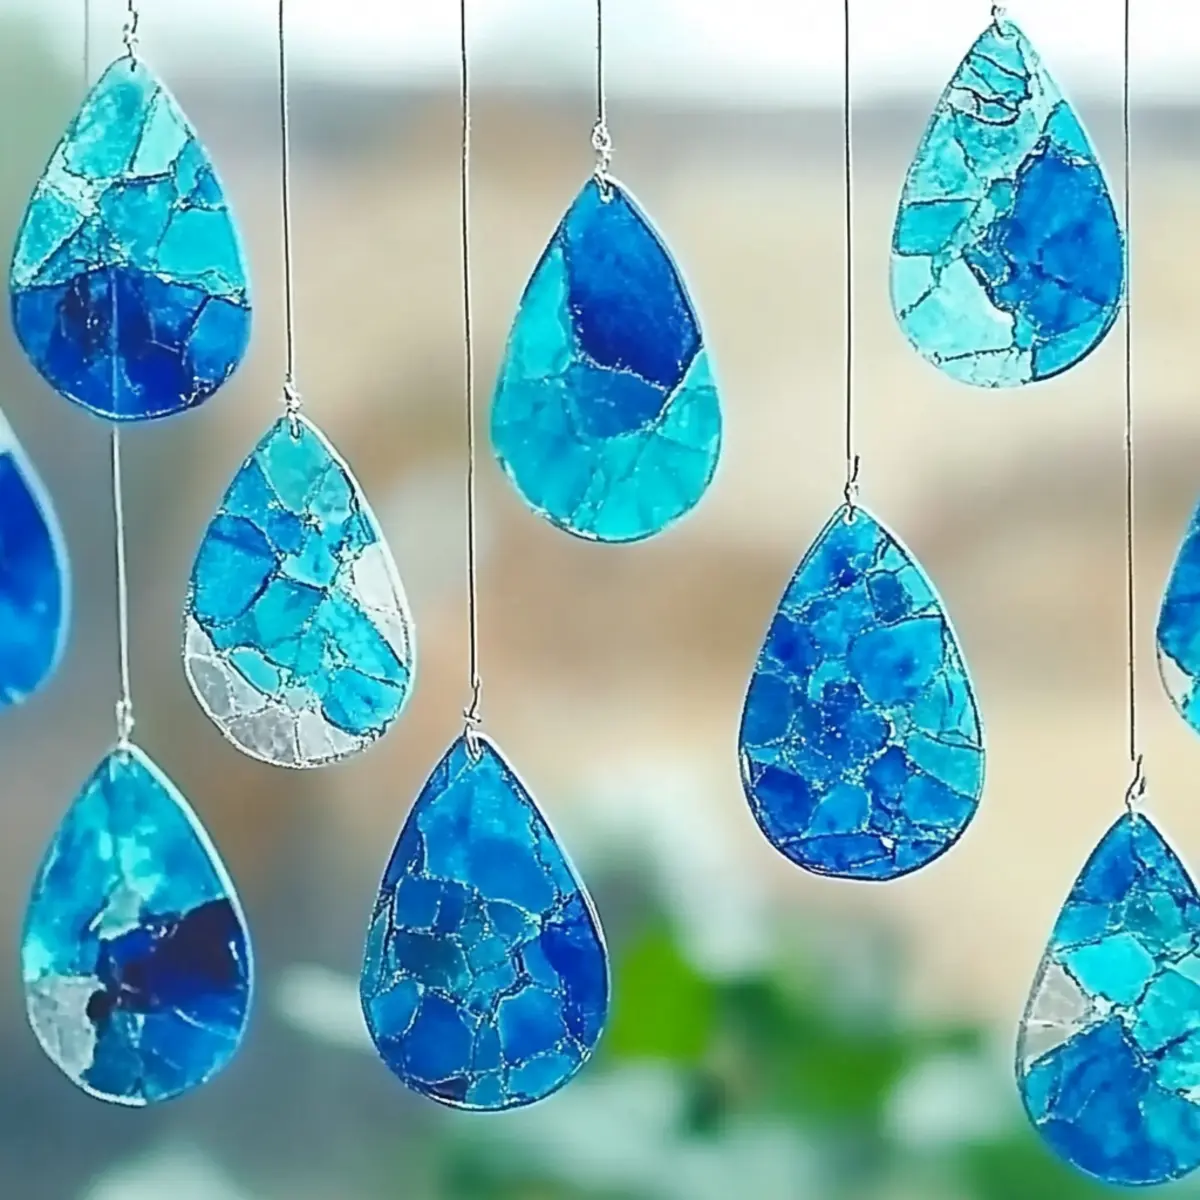
Rainy days often call for a splash of creativity, don't you think? As the pitter-patter of raindrops dances against the window, I find myself yearning for brighter colors to fill the room. That's exactly where these enchanting Blue Crayon Raindrop Suncatchers come into play! This simple DIY craft is not only a wonderful way to engage the little ones but also a perfect opportunity for them to express their artistic flair while improving fine motor skills.
I stumbled across this delightful project while seeking ways to brighten up our gloomy afternoons, and I can assure you, it's a true gem. Using just a few household supplies, these suncatchers transform ordinary crayons into stunning pieces of art that shimmer when kissed by sunlight. Plus, they make for the perfect decoration, adding an effortless charm to your windows and filling your space with a cheerful spirit. So, roll up those sleeves and let's dive into this colorful adventure that's sure to keep the kids smiling!

Why will you love Blue Crayon Raindrop Suncatchers?
Fun and Engaging: This craft project sparks joy and creativity, making it a fantastic way to bond with kids while keeping them entertained indoors.
Easy to Make: Using just a few common supplies, the process is simple enough for even the youngest crafters to enjoy.
Creative Expression: Children can explore color combinations and shapes, allowing them to express their unique artistic styles.
Versatile Design: Feel free to experiment with different colors and shapes, creating a variety of suncatchers for different seasons or themes.
Delightful Glow: When hung in windows, these suncatchers radiate beautiful colors, creating a stunning visual display and positively transforming any room.
Memorable Keepsakes: These suncatchers not only brighten your space but also serve as cherished mementos of fun-filled crafting sessions, evoking memories for years to come.
Blue Crayon Raindrop Suncatcher Ingredients
• Get ready to create magical suncatchers with these essential ingredients!
For the Suncatcher
- Blue Crayons - Provide vibrant colors; mix different shades for a stunning effect.
- Waxed Paper - Acts as a base for melting crayon shavings; ensure it's heat-resistant.
- Iron - Necessary for melting the crayon shavings; always supervise kids during this step.
- Scissors - Required for cutting the cooled shapes; safety first!
- Embroidery Floss or String - Perfect for hanging your lovely suncatcher.
- Hole Punch - Creates neat holes for threading the string; a must-have for easy hanging!
- Permanent Marker, Glitter, or Clear Vinyl (Optional) - Add extra flair and personalization; let your creativity shine!
Don't forget, these Blue Crayon Raindrop Suncatchers will radiate cheer and creativity in your home!
How to Make Blue Crayon Raindrop Suncatchers
-
Prep Crayons: Begin by using a pencil sharpener to create shavings from your blue crayons. Aim for a variety of shades to achieve a dynamic, eye-catching effect that captures the light beautifully.
-
Layer Wax Paper: Lay out a sheet of waxed paper on a flat, safe surface. This will be the foundation for your colorful masterpiece, so make sure it's smooth and clean.
-
Sprinkle Crayon Shavings: Evenly distribute the blue crayon shavings across the waxed paper, playing with different shades and patterns. Let your creativity flow; the more shavings, the lovelier the final product!
-
Cover and Melt: Carefully place another sheet of waxed paper on top. With adult supervision, gently press a hot iron over the layers until the crayons melt into a vibrant pool of color. Aim for a smooth, even melt, which usually takes just a few moments.
-
Cut Shapes: Once the paper has cooled down, use scissors to cut out your melted creation into charming shapes. Raindrops, stars, or hearts all make delightful suncatchers that will spark joy!
-
Create Hang Holes: Grab your hole punch and make holes at the top of each shape. This will prepare your beautiful suncatchers for hanging in your sunny windows.
-
Add String: Thread some embroidery floss or string through the holes you created, ensuring it's secure for hanging. A simple knot will do the trick!
Optional: Try adding a sprinkle of glitter to the crayon shavings before melting for an extra touch of sparkle.
Exact quantities are listed in the recipe card below.

Expert Tips for Blue Crayon Raindrop Suncatchers
-
Safety First: Always supervise children during the melting process. Keep the iron away from reach until it's cool to prevent burns.
-
Low Heat Setting: Use a low heat setting on the iron to avoid burning the waxed paper. High heat can ruin your colorful creation.
-
Creative Color Blending: For added depth, blend in hints of white or purple crayon shavings, creating a beautiful cloudy effect in your suncatchers.
-
Cut Carefully: Make sure to use blunt-tip scissors for safety, especially with younger children. Always cut shapes after cooling to avoid accidents.
-
Experiment with Shapes: Don't limit yourself to raindrops! Try various shapes like stars or hearts to make festive decorations for different occasions.
-
Display Tips: Hang multiple suncatchers together for an eye-catching window display that brightens up your home and brings smiles to everyone!
Blue Crayon Suncatcher Variations
Get ready to unleash your creative spirit and personalize your suncatcher experience with these delightful twists!
-
Rainbow Mix: Combine multiple crayon colors for a vibrant, layered effect that brightens any window with a cheerful spectrum. Get adventurous and mix those colors!
-
Shimmering Glitter: Add a sprinkle of glitter to the crayon shavings before melting for a sparkling finish that truly captivates the eye. Who doesn't love a little extra dazzle?
-
Pastel Palette: Use soft pastel crayons for a subtle, dreamy effect perfect for spring-themed decorations. Imagine the gentle glow as sunlight filters through!
-
Shape Shift: Explore different shapes like hearts, stars, or flowers to match various occasions or seasons. This adds a playful twist to the classic raindrop design.
-
Textured Layers: Incorporate multiple sheets of waxed paper with varying crayon textures for a unique multi-dimensional suncatcher. Layering creates a captivating visual effect!
-
Nature-Inspired: Experiment with natural colors like greens and browns for a nature-themed suncatcher that celebrates the beauty of the outdoors. Let the beauty of nature inspire you!
-
Seasonal Shades: Create themed suncatchers for different holidays or seasons by using colors like red and green for Christmas or orange and yellow for autumn. Celebrate every season's charm!
Let your imagination soar, and enjoy the process of crafting these magical suncatchers that brighten up any rainy day!
Storage Tips for Blue Crayon Raindrop Suncatchers
- Room Temperature: Display your blue crayon raindrop suncatchers immediately after crafting for the best effect. Keep them out of direct sunlight to prevent fading.
- Fridge: If you need to preserve them temporarily, place your suncatchers flat between sheets of waxed paper to avoid scratches. This method will keep them safe for up to a week.
- Make-Ahead Tips: These suncatchers are quick to create, but if you want to craft ahead, complete and store them as outlined to maintain their vibrant colors and shine.
- Reheating: Should you need to reshape any melted areas, gently warm the suncatchers with a low heat iron for a few seconds, but ensure the layers do not burn or become sticky.
Make Ahead Options
These Blue Crayon Raindrop Suncatchers are perfect for busy crafters looking to save time! You can prep the crayon shavings up to 24 hours in advance; simply store them in an airtight container to keep them fresh. The waxed paper layering can also be done ahead-just prepare and sandwich your crayon shavings between two sheets of waxed paper, and place it in the fridge until you're ready to melt. When it's time to create, simply take out your prepared layers, melt them with the iron, and proceed with cutting out the shapes. Following these make-ahead tips will ensure your suncatchers are just as vibrant and beautiful, making crafting effortless and enjoyable!
What to Serve with Blue Crayon Raindrop Suncatchers?
Let your creative spirit fill the room with cheer by pairing these delightful crafts with fun activities that enhance the experience!
- Colorful Construction Paper: Add a vibrant backdrop for your finished suncatchers, which will make them pop even more against the light. You can use the leftover paper for more crafts!
- Art Supplies: Bring out the markers, stickers, and paints for kids to personalize their suncatchers or create matching art pieces, adding a personal touch to their creativity.
- Crafting Snacks: Serve up some fun, easy snacks like fruit kabobs or colorful vegetable sticks to keep energy levels high while the little ones create their masterpieces.
- Storytime Session: After your crafting adventure, gather the kids for a cozy storytime that ties in with the themes of light and color! Choose bright, illustrated books to complement the day.
- Music Playlist: Create an upbeat music playlist to enhance the crafting atmosphere! Play their favorite tunes to keep spirits high-music adds a joyous vibe to any activity.
- Sunny Afternoon Tea: For a relaxing wind-down, serve some refreshing lemonade or iced tea to cool off after a fun-filled crafting session. This can be a perfect time for parents to join in!
Blue Crayon Raindrop Suncatchers Recipe FAQs
What type of blue crayons should I use?
Absolutely, using high-quality blue crayons is key! I suggest choosing both typical and unique shades, such as teal or navy, to achieve a rich, vibrant look. Crayola or similar brands work well because they melt smoothly and deliver better color mixing.
How should I store my blue crayon suncatchers after making them?
For optimal display, hang your suncatchers immediately. If you need to store them, keep them flat between sheets of waxed paper at room temperature, away from direct sunlight, to avoid fading. They can stay safe this way for up to a week.
Can I freeze the blue crayon suncatchers to preserve their shape?
While it's not recommended to freeze them, you can maintain their integrity by storing them flat as mentioned before. Freezing may cause the wax to become brittle, leading to cracks.
What should I do if my melted crayon suncatcher is too thick?
No worries! If your suncatcher is too thick and doesn't hang well, simply reheat it gently with a low heat iron. Press evenly until it softens and then reshape it while warm. Be sure to monitor closely to prevent burning or sticking!
Are these blue crayon suncatchers safe for young children?
Very! While the crafting process is safe, especially with adult supervision during the ironing phase, always ensure that kids handle scissors and other tools safely. Using blunt-tip scissors can further minimize any risk when cutting shapes.
Can I incorporate other colors or materials into my suncatchers?
Absolutely! Feel free to experiment with different colored crayons for themed suncatchers, or even add glitter for an extra sparkle. Just remember to blend your colors thoughtfully to make sure they look lovely and cohesive once melted.

Blue Crayon Raindrop Suncatchers: Fun Crafts for Sunny Days
Equipment
- Iron
- scissors
- Hole punch
Ingredients
Suncatcher Ingredients
- blue crayons Blue Crayons Provide vibrant colors; mix different shades for a stunning effect.
- 1 sheet Waxed Paper Acts as a base for melting crayon shavings; ensure it’s heat-resistant.
- 1 piece Embroidery Floss or String Perfect for hanging your lovely suncatcher.
- 1 punch Hole Punch Creates neat holes for threading the string; a must-have for easy hanging!
- 1 marker Permanent Marker (Optional) Add extra flair and personalization; let your creativity shine!
- 1 dash Glitter (Optional) Add extra flair and personalization; let your creativity shine!
- Iron Necessary for melting the crayon shavings; always supervise kids during this step.
Instructions
Instructions for Crafting
- Begin by using a pencil sharpener to create shavings from your blue crayons. Aim for a variety of shades to achieve a dynamic, eye-catching effect that captures the light beautifully.
- Lay out a sheet of waxed paper on a flat, safe surface. This will be the foundation for your colorful masterpiece, so make sure it's smooth and clean.
- Evenly distribute the blue crayon shavings across the waxed paper, playing with different shades and patterns. Let your creativity flow; the more shavings, the lovelier the final product!
- Carefully place another sheet of waxed paper on top. With adult supervision, gently press a hot iron over the layers until the crayons melt into a vibrant pool of color. Aim for a smooth, even melt, which usually takes just a few moments.
- Once the paper has cooled down, use scissors to cut out your melted creation into charming shapes. Raindrops, stars, or hearts all make delightful suncatchers that will spark joy!
- Grab your hole punch and make holes at the top of each shape. This will prepare your beautiful suncatchers for hanging in your sunny windows.
- Thread some embroidery floss or string through the holes you created, ensuring it's secure for hanging. A simple knot will do the trick!


Leave a Reply