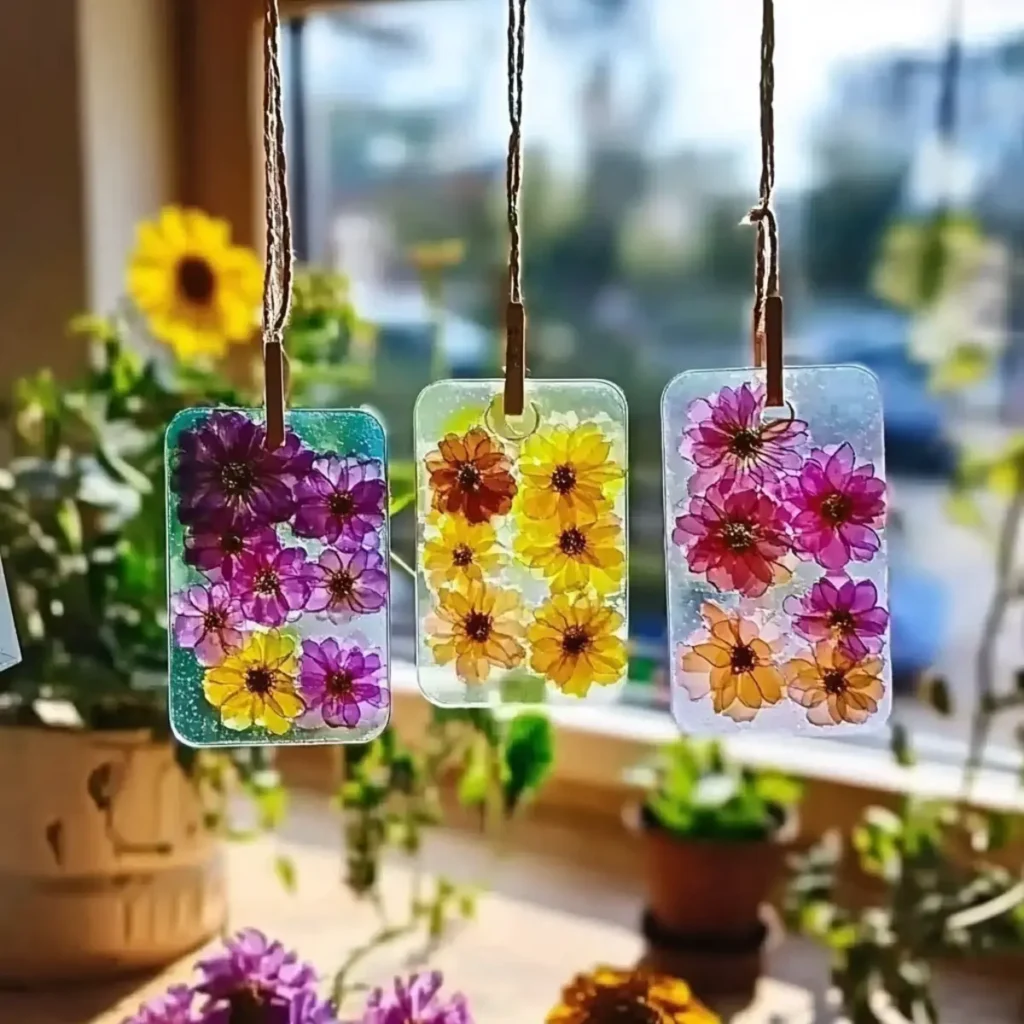
When the sun shines through colorful suncatchers, it creates a magical display that can brighten even the cloudiest of days. I stumbled upon this delightful craft while looking for a fun project to do with my kids, and let me tell you, it turned into an enchanting afternoon filled with laughter and creativity! These Eco-Friendly Blue Crayon Suncatchers are not just a vibrant addition to your home decor; they're also a fantastic way to engage your little ones in a hands-on, eco-conscious activity.
What I love most about this DIY project is its simplicity. With just a few natural ingredients, you can whip up stunning suncatchers in less than 15 minutes! Plus, they can easily be customized with your choice of colors and embellishments, making them perfect for every season and occasion. Join me in making these charming crafts that will not only enhance your living space but also provide a refreshing alternative to traditional plastic decor-all while sparking joy for both kids and adults!
Bioplastic Suncatchers: What Makes Them Special?
Uniqueness: These bioplastic suncatchers are a charming blend of art and eco-friendliness, offering an innovative way to enjoy crafting.
Super Quick: With just 15 minutes of prep, you'll see vibrant results without the long wait!
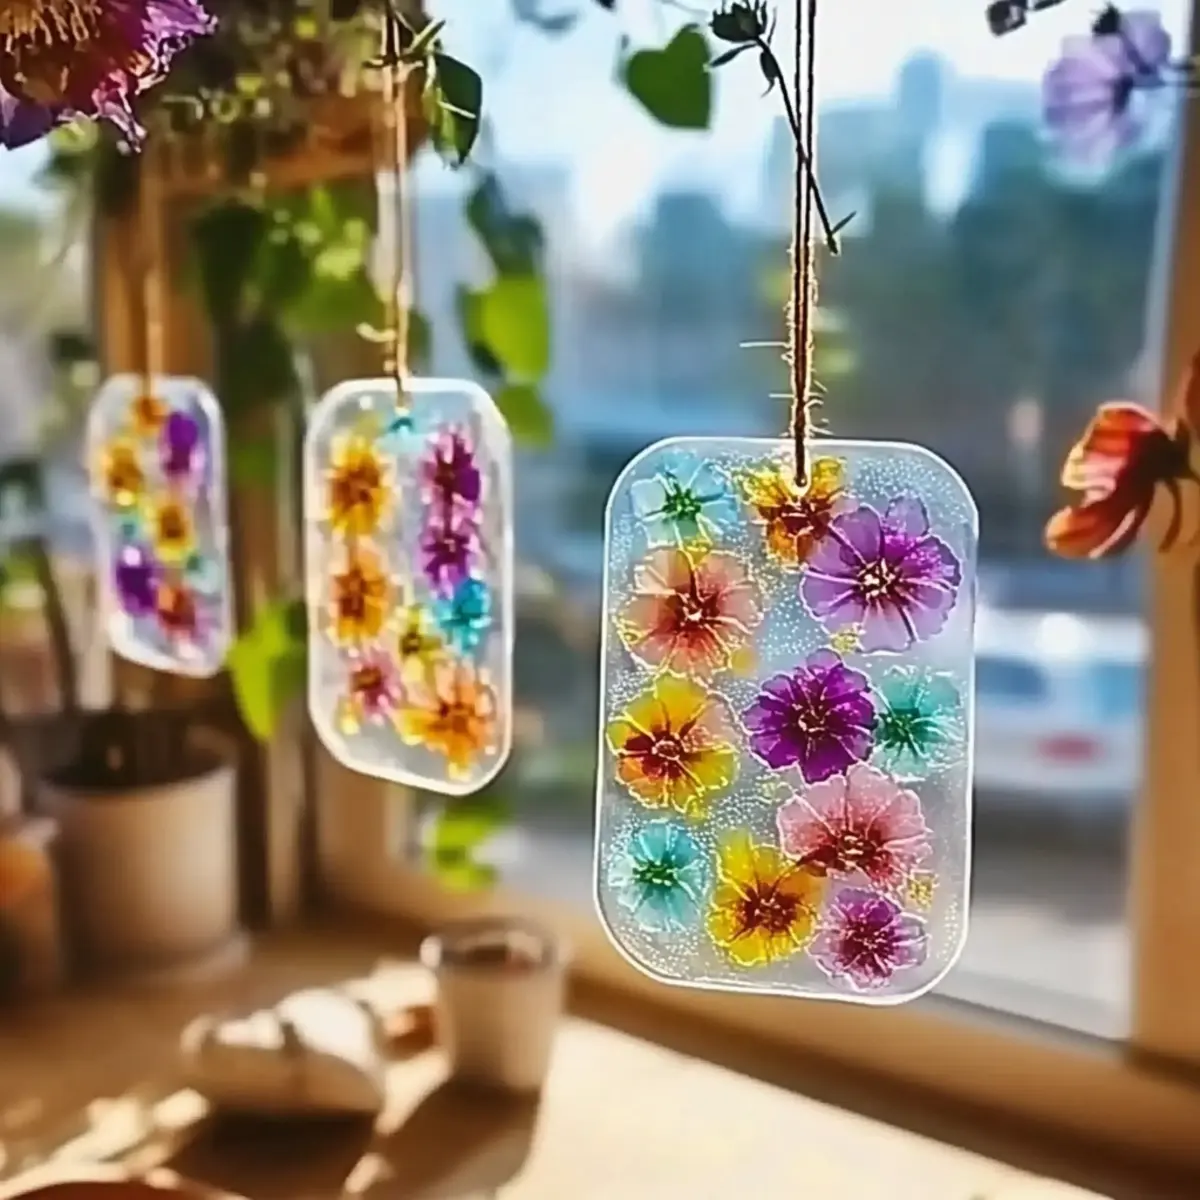
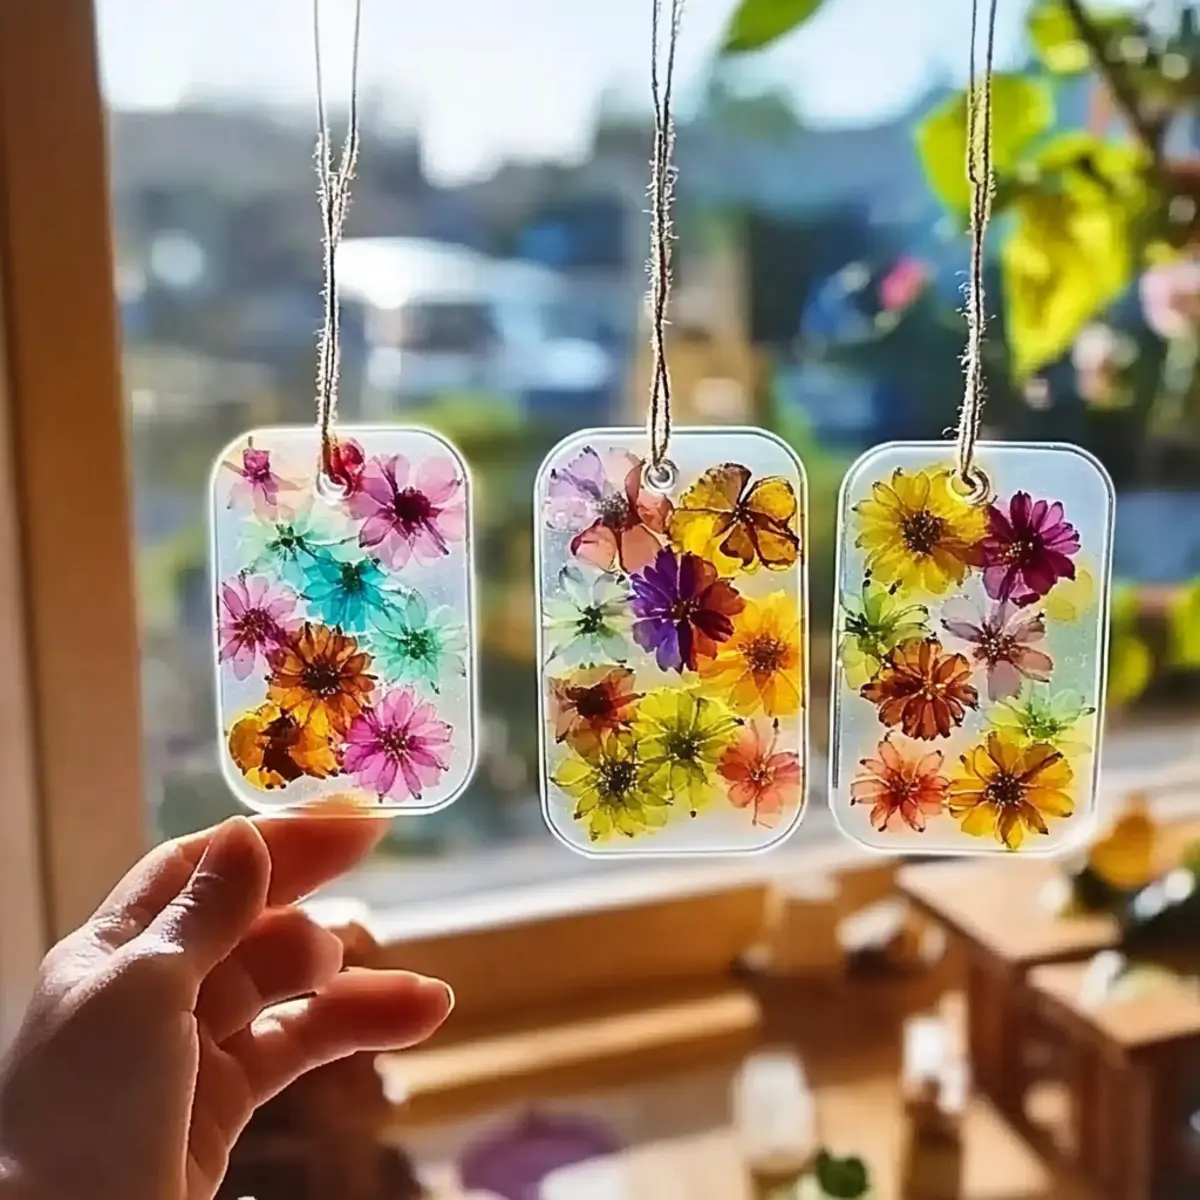
Customizable: Get creative! Personalize each suncatcher with colors and embellishments to reflect every season.
Family Fun: Engage your kids in this hands-on project that promotes creativity while teaching eco-consciousness.
Stunning Decor: Brighten your home with these eye-catching pieces that let in beautiful sunlight, creating a magical ambiance.
Environmentally Friendly: Made from non-toxic, biodegradable ingredients, these suncatchers are a guilt-free option for home decor.
Bioplastic Suncatcher Ingredients
• Discover the essential components for crafting bioplastic suncatchers!
For the Base Mixture
- Water - A vital component that blends all other ingredients together.
- Cornstarch - Helps create a smooth texture and adds structure to your suncatchers.
- White Vinegar - Enhances clarity of the gel while acting as a natural preservative.
- Unflavored Gelatin Powder - Provides that perfect gel-like consistency for shaping.
For Coloring
- Natural or Food-Safe Coloring - Gives your suncatchers their vibrant hue; you can use beet juice or turmeric for a splash of fun!
Optional Embellishments
- Fine Glitter - Adds a touch of sparkle; opt for biodegradable options to stay eco-friendly.
- Dried Flower Petals - Perfect for incorporating a natural element and enhancing beauty.
- Tissue Paper Bits - Offer an imaginative way to personalize your suncatchers while being biodegradable.
These ingredients come together to create stunning bioplastic suncatchers that not only delight the eye but also honor our commitment to the environment!
How to Make Bioplastic Suncatchers
-
Combine Ingredients: In a saucepan, mix ½ cup water, 2 tbsp cornstarch, 1 tbsp white vinegar, and 1 tbsp gelatin. Stir gently until the mixture is smooth and well combined.
-
Heat Mixture: Gently heat over medium-low heat, stirring continuously. This will take about 3-5 minutes until the mixture transforms into a gel-like consistency. Remove from heat once it appears smooth and pourable.
-
Add Color: Divide the gel among bowls and stir in your chosen natural or food-safe coloring until you achieve your desired shades. Let your creativity shine!
-
Shape the Suncatchers: Spread the colored gel onto a non-stick surface, like parchment paper. Use a spatula or the back of a spoon to create various shapes, allowing for imaginative designs.
-
Decorate: Before the gel sets, use toothpicks to add embellishments like biodegradable glitter, flower petals, or tissue paper bits. This adds uniqueness and flair to each piece.
-
Allow to Dry: Set the suncatchers in a well-ventilated area to air dry for 24-48 hours. Don't forget to flip them halfway through to prevent curling!
-
Final Touches: Create hanging holes using a hole punch and thread string through each one, or attach suction cups for easy display in sunny windows.
Optional: Experiment with different colors and embellishments for a personalized touch!
Exact quantities are listed in the recipe card below.

What to Serve with Bioplastic Suncatchers?
Creating beautiful bioplastic suncatchers is a marvelous way to bring a touch of color into your home while engaging in a fun, eco-friendly craft.
-
Colorful Craft Station: Set up a crafting station with various natural colorants to inspire creativity. This encourages family bonding time while exploring vibrant hues.
-
Nature Walk Treat: After crafting, take a nature walk to find dried flowers or leaves to use as embellishments in your suncatchers. It's a delightful way to connect with nature before displaying your creations.
-
Art Display Corner: Dedicate a sunny window corner for showcasing completed suncatchers. Watching the sunlight dance through them adds an ethereal charm to your home decor.
-
DIY Craft Party: Host a craft party with friends or neighbors where everyone creates their own suncatchers, sharing tips and enjoying each other's unique designs.
-
Eco-Friendly Refreshments: Serve organic juices or homemade lemonade to keep the eco-friendly theme alive while providing a refreshing sip during your crafting session.
-
Seasonal Themes: Tailor your suncatcher designs and refreshments to match the seasons, enhancing the experience with seasonal fruits or colors that reflect the time of year.
-
Crafting Playlist: Create a joyful playlist of upbeat songs to enjoy while crafting, making the day even more memorable and fun for everyone involved.
-
Family Photo Shoot: Capture the day by taking photos of everyone with their finished suncatchers, creating a scrapbook page or blog post showcasing your fun-filled crafting adventure!
Make Ahead Options
These Eco-Friendly Blue Crayon Suncatchers are perfect for busy home cooks looking to save time during their crafting sessions! You can prepare the gel mixture up to 24 hours in advance; simply combine ½ cup water, 2 tbsp cornstarch, 1 tbsp white vinegar, and 1 tbsp gelatin, and store it in an airtight container in the fridge. For added convenience, you can even divide the gel into bowls and mix in your coloring before refrigerating. When you're ready to craft, simply reheat the mixture gently to return it to a pourable consistency. Just remember to allow plenty of time for drying (24-48 hours) once shaped, so you'll have stunning suncatchers ready to brighten your home!
Storage Tips for Bioplastic Suncatchers
-
Cool, Dry Place: Store finished bioplastic suncatchers in a cool, dry area away from direct sunlight to prevent melting or warping. They can last for up to a season with proper care.
-
Airtight Container: If you want to keep them for longer, place the suncatchers in an airtight container lined with tissue to avoid sticking and protect delicate surfaces.
-
Reheating: If they begin to lose shape, briefly warm them in your hands or in the sun for a few minutes to reshape before displaying again.
Expert Tips for Bioplastic Suncatchers
-
Even Spread: Ensure you distribute the gel evenly when spreading onto the non-stick surface for uniformity in drying and clarity.
-
Midway Flip: Flip the suncatchers halfway through the drying process to prevent curling and maintain desired shapes.
-
Careful with Decor: Remember, these suncatchers are not edible-use non-toxic materials and keep them out of reach from young children.
-
Eco-Friendly Choices: Stick to biodegradable glitter and natural embellishments to keep your bioplastic suncatchers truly eco-friendly.
-
Experiment-Inspired Creations: Feel free to mix different colors and decorations! Each unique combination will reflect your creativity and seasonal spirit.
Bioplastic Suncatchers: Delicious Variations for a Personal Touch
Feel free to add your own creative spin to this delightful craft that will light up your home!
- Color Swaps: Use different natural colors like beet juice for red or turmeric for yellow to suit seasonal themes.
- Glitter Boost: Incorporate biodegradable glitter for extra sparkle; it'll shimmer beautifully in the sunlight.
- Textured Touch: Press in dried flower petals or leaves for an organic look that makes your suncatchers uniquely beautiful.
- Different Shapes: Experiment with various molds such as hearts, stars, or even animal outlines for added fun.
- Layering Styles: Create multi-layered suncatchers by allowing one color to set before adding another for depth and dimension.
- Themed Decor: Choose colors and shapes that reflect holidays or events, like pastel shades for Easter or red and green for Christmas.
- Scented Additions: Mix in a few drops of essential oils like lavender or lemon to add a lovely scent to your craft.
- Heat Levels: For added excitement, sparkle up your designs with a hint of hot pepper flakes mixed in for an eye-catching surprise!
The possibilities are endless, allowing you to craft bioplastic suncatchers that resonate with your personality and style!
Bioplastic Suncatchers Recipe FAQs
How do I choose the right colors for my suncatchers?
Absolutely! For vibrant suncatchers, I recommend using natural or food-safe coloring like beet juice for red, turmeric for yellow, and spirulina for green. Feel free to mix and match colors based on the seasons or themes-get creative! Your choice can reflect cheerful summer vibes or cozy autumn hues.
How should I store my finished bioplastic suncatchers?
To keep your bioplastic suncatchers safe, store them in a cool, dry place away from direct sunlight-this prevents any melting or warping. They can last up to a season! For added longevity, place your suncatchers in an airtight container lined with tissue paper. This keeps them from sticking together while protecting fragile surfaces.
Can I freeze the bioplastic suncatchers?
It's not recommended to freeze these suncatchers, as the freezing process may alter their structure and appearance. Instead, focus on storing them properly in a cool environment. If you notice they start to warp, gently reshape them in your hands or warm them in the sun for a few minutes before displaying them again.
What should I do if my suncatchers stick to the surface while drying?
Very! If your suncatchers feel stuck, try applying a thin layer of cooking spray or oil to your non-stick surface before spreading the gel in the future. If they've already dried and are stuck, place them in the sun for a few minutes; the warmth will help loosen them up gently. Just be cautious not to overheat them!
Are there any dietary considerations for pets or allergies?
While these bioplastic suncatchers are made from non-toxic ingredients, keep them out of reach of pets and small children, as they aren't intended for consumption. If anyone has allergies, especially to gelatin or certain colorants, you can use alternatives like agar-agar and natural coloring options to make it safe for everyone involved.
How can I enhance my bioplastic suncatchers further?
I often recommend using biodegradable glitter or pressed flower petals as fun embellishments that can take your suncatchers to the next level! Simply add your chosen decorations to the gel before it sets. Feel free to personalize the shapes and colors too, ensuring that each suncatcher truly reflects your style and creativity!

Bioplastic Suncatchers: Easy Eco-Friendly Craft for All Ages
Equipment
- Saucepan
- spatula
- Non-stick surface or parchment paper
- Bowls for coloring
- Hole punch
Ingredients
For the Base Mixture
- 0.5 cups water
- 2 tbsp cornstarch
- 1 tbsp white vinegar
- 1 tbsp unflavored gelatin powder
For Coloring
- natural or food-safe coloring e.g., beet juice or turmeric
Optional Embellishments
- fine glitter opt for biodegradable
- dried flower petals
- tissue paper bits biodegradable
Instructions
Making the Suncatchers
- In a saucepan, mix ½ cup water, 2 tbsp cornstarch, 1 tbsp white vinegar, and 1 tbsp gelatin. Stir gently until the mixture is smooth and well combined.
- Gently heat over medium-low heat, stirring continuously for about 3-5 minutes until the mixture transforms into a gel-like consistency. Remove from heat once smooth.
- Divide the gel among bowls and stir in your chosen coloring until you achieve your desired shades.
- Spread the colored gel onto a non-stick surface, creating various shapes with a spatula or spoon.
- Before the gel sets, use toothpicks to add embellishments like glitter, flower petals, or tissue paper.
- Set the suncatchers in a well-ventilated area to air dry for 24-48 hours, flipping halfway through.
- Create hanging holes using a hole punch and thread string through each one, or attach suction cups for display.


Leave a Reply