
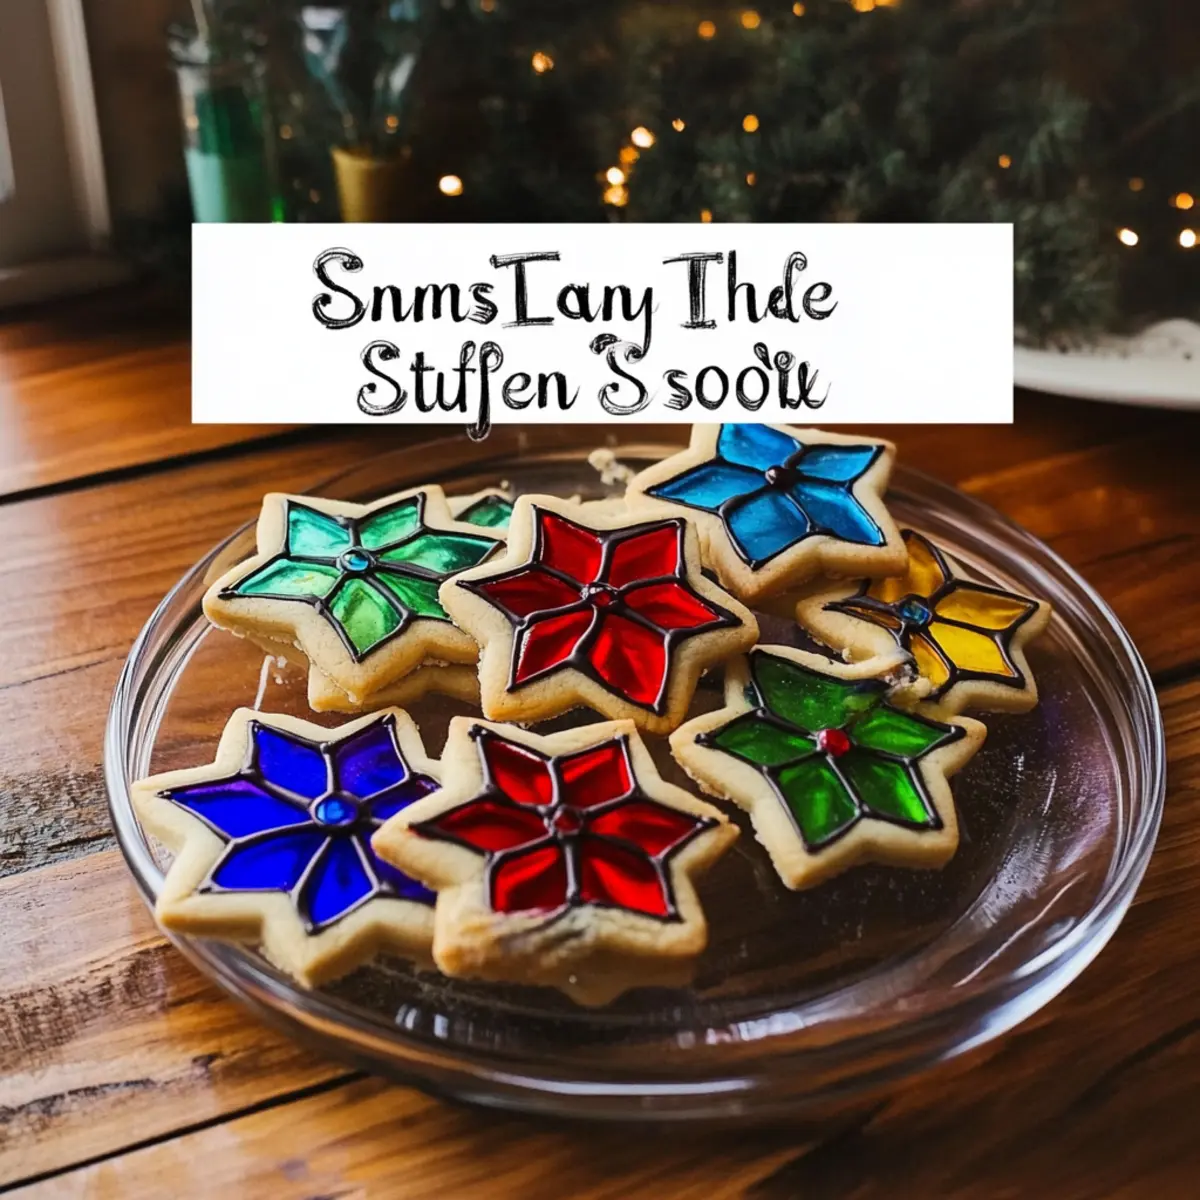
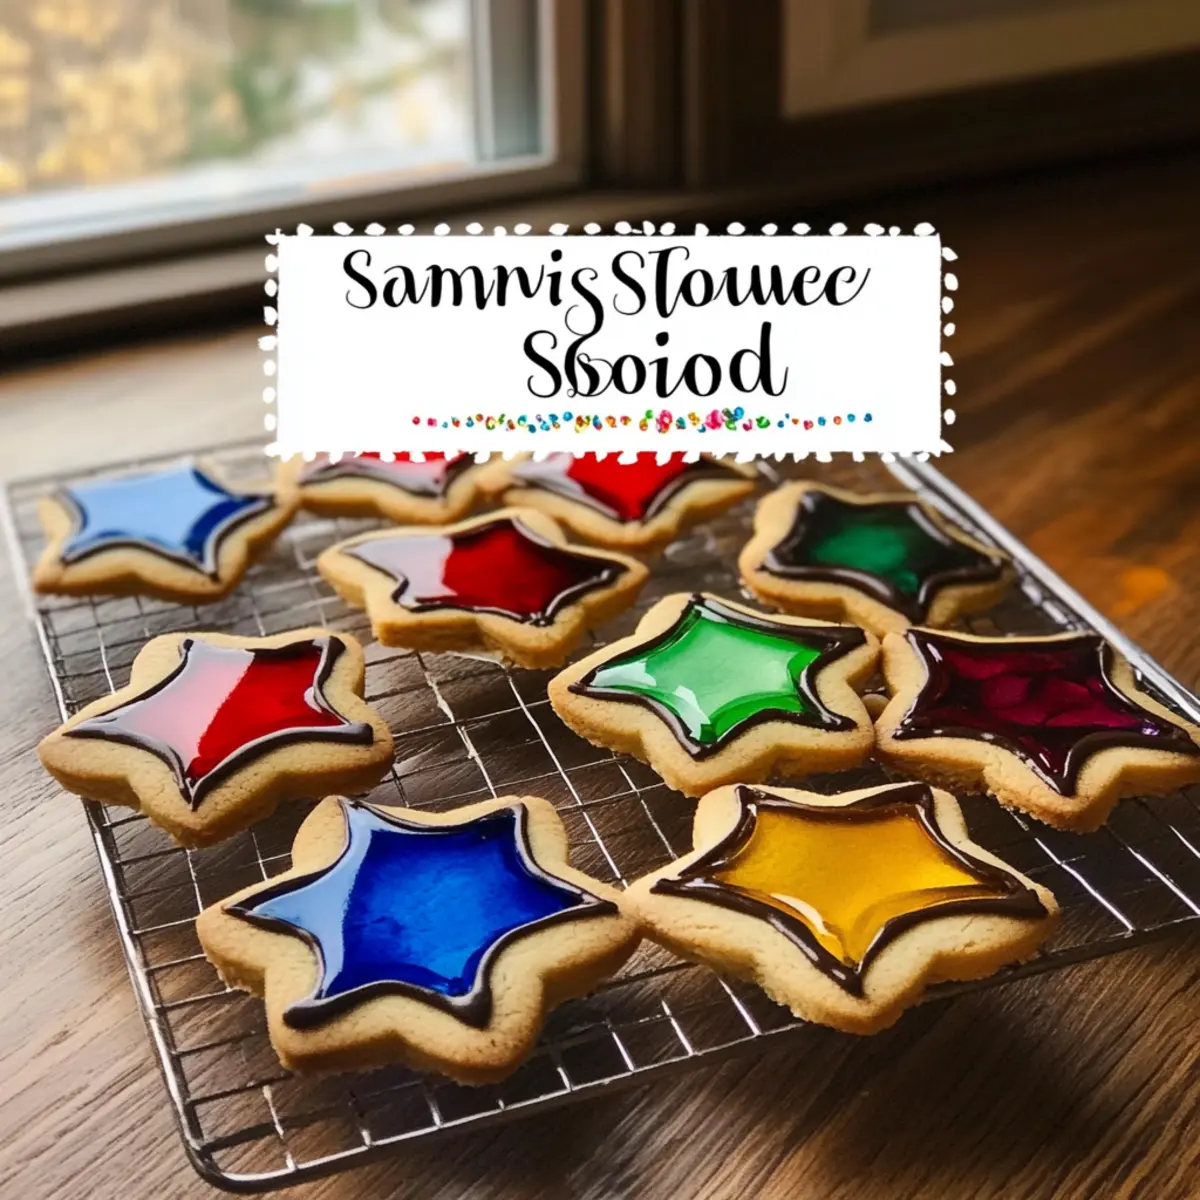
When the holiday season rolls around, my heart fills with nostalgia as I recall the joy of baking stained glass cookies. There's something enchanting about watching vibrant candy melt into beautiful, jewel-toned centers that pop against a crisp sugar cookie backdrop. These delightful treats are more than just a dessert; they double as stunning decorations or heartfelt gifts for loved ones. Each time I pull a tray from the oven, the sweet aroma of vanilla and melting sugar fills my kitchen, transporting me to a world of festive cheer.
Whether you're gathering with family or hosting a holiday party, these stained glass cookies will steal the show with their vibrant colors and simple charm. Plus, they're incredibly fun to make-a perfect activity to share with kids or friends who want to immerse themselves in the holiday spirit. Ready to create a new holiday tradition? Let's get started with this Stained Glass Cookies Recipe from Emma's Cake Studio that's sure to impress everyone around your table!

Why love this Stained Glass Cookies Recipe?
Irresistible Visual Appeal: These cookies are not just delicious; they're a feast for the eyes! The colorful candy centers create a striking stained glass effect that adds a festive touch to any holiday table.
Interactive Baking Fun: Gather your loved ones for a magical baking session! Making these cookies is an activity that kids and adults alike will cherish, creating lasting memories in the kitchen.
Easy Customization: Feel free to get creative! Use different cookie shapes or flavor variations, such as adding almond extract for a unique twist.
Perfect for Gifting: Looking for a thoughtful present? These stained glass cookies make beautiful gifts, perfect for friends and family during the holidays.
Save Time: With a prepare-ahead option and straightforward steps, this recipe will not only simplify your baking but also leave you with extra time to enjoy the festivities.
Whether you're decking the halls or gathering around the table, this stained glass cookies recipe will undoubtedly be the highlight of the season!
Stained Glass Cookies Ingredients
For the Cookie Dough
- All-Purpose Flour - Essential for the structure; swap with a gluten-free blend if needed.
- Baking Powder - A leavening agent that helps achieve a soft texture; make sure it's fresh!
- Salt - Enhances the flavors; fine sea salt works best for even distribution.
- Unsalted Butter - Provides richness and moisture; ensure it's softened for easy mixing.
- Granulated Sugar - Sweetener that contributes to the cookie structure; coconut sugar is a great alternative for a lower glycemic index.
- Large Egg - Binds the dough and adds moisture; use a flax egg for a vegan option.
- Vanilla Extract - Adds depth to the flavor; consider almond extract for a unique twist.
For the Candy Center
- Assorted Hard Candies - Creates that stunning stained glass effect; Jolly Ranchers are perfect for bright colors and clarity.
For Finishing Touches
- Powdered Sugar - Optional for a festive dusting to enhance presentation.
- Ribbon or String - Optional for hanging cookies as delightful ornaments.
These stained glass cookies ingredients will help you create a holiday treat that's not only tasty but visually captivating! Happy baking!
How to Make Stained Glass Cookies
-
Cream Together: Start by creaming softened butter and granulated sugar until light and fluffy, which should take about 2-3 minutes. This creates a lovely base for your cookies.
-
Mix in Egg & Flavor: Next, add in the large egg, vanilla extract, and optional almond extract. Mix until fully incorporated, ensuring a luscious, sweet mixture.
-
Combine Dry Ingredients: Gradually add the all-purpose flour, baking powder, and salt to the mixture, mixing until just combined. Be careful not to overmix, as this can create tough cookies.
-
Chill the Dough: Shape the dough into a disk and wrap it in plastic wrap. Chill it in the refrigerator for at least 1 hour to help the cookies maintain their shape during baking.
-
Roll & Cut Shapes: On a lightly floured surface, roll out the chilled dough to about ¼-inch thickness. Use a large cookie cutter to cut out shapes, and a smaller cutter to create windows for the candy centers.
-
Prepare Candy Centers: Transfer the cutouts to a lined baking sheet. Spoon a mix of crushed hard candies into the center of each cookie shape, ensuring you don't overfill them to prevent spilling.
-
Bake Cookies: Preheat the oven to 350°F (175°C). Bake the cookies for about 8-10 minutes, or until the edges are golden and the candy is completely melted.
-
Cool and Transfer: Allow the cookies to cool on the baking sheet for a few minutes, then gently transfer them to a wire rack to cool completely.
-
Dust and Decorate: If desired, dust the cookies with powdered sugar for an extra festive flair. If you want to hang them as ornaments, carefully thread ribbon through the holes while the cookies are still warm.
Optional: You can add a sprinkle of colored sugar before baking for an extra sparkle!
Exact quantities are listed in the recipe card below.

What to Serve with Stained Glass Cookies?
Elevate your festive gathering by pairing these stunning treats with delightful accompaniments that enhance their charm.
-
Hot Cocoa: Rich, creamy hot cocoa is a classic pairing that complements the sweetness of the cookies while adding a cozy touch to your holiday spread.
-
Fruit Salad: A fresh, vibrant fruit salad offers a delightful contrast to the sugary cookies. The natural sweetness and acidity will cleanse the palate beautifully!
-
Cheese Platter: A selection of soft cheeses, such as brie or cream cheese, provides a savory balance to the sweetness of stained glass cookies, tantalizing the taste buds.
-
Eggnog or Spiced Cider: These seasonal drinks bring a warm, spiced flavor that fits perfectly with the holiday spirit and complements the sweetness of the cookies.
-
Decorative Cookie Platter: Arrange assorted holiday cookies alongside your stained glass beauties for a visually stunning display that invites everyone to indulge in a variety of flavors and textures.
-
Chocolate-Dipped Strawberries: The tartness of fresh strawberries dipped in chocolate adds a gourmet touch to your dessert table, providing a luscious contrast to the crunch of the cookies.
-
Gingerbread Men: Another classic holiday treat, gingerbread cookies add a warm spice element that pairs wonderfully with the vibrant colors and sweetness of your stained glass cookies.
-
Vanilla Ice Cream: Serve a scoop of creamy vanilla ice cream on the side, allowing everyone to dip their cookies for a delicious dessert experience that's simply delightful.
Stained Glass Cookies Variations
Feel free to let your creativity shine by customizing these cookies with delightful twists and substitutions!
-
Gluten-Free: Substitute all-purpose flour with a 1-to-1 gluten-free flour blend for a delightful treat everyone can enjoy.
-
Vegan Option: Replace the egg with a flax egg (1 tablespoon flaxseed meal + 2.5 tablespoons water) for a plant-based version that retains texture and flavor.
-
Nutty Flavor: Swap vanilla extract for almond extract to add a unique nutty essence that complements the candy beautifully.
-
Citrus Kick: Add a teaspoon of lemon or orange zest to the dough for a zesty surprise that brightens the flavor profile. This aromatic twist will elevate your cookies to new heights!
-
Candy Variety: Experiment with different candy types, like sour candies or gummies, for an unexpected flavor combination that adds a fun twist.
-
Chocolate Drizzle: After cooling, drizzle melted chocolate over the cookies for an indulgent touch that enhances both taste and presentation. The contrast of chocolate with candy colors is simply heavenly.
-
Spiced Variation: Incorporate a pinch of cinnamon or nutmeg into your dough for a warm, fragrant spice that resonates perfectly with holiday vibes.
-
Colorful Sugar: Before baking, sprinkle the tops with colorful sugar or edible glitter for a festive finish that's sure to catch the eye.
Embrace the spirit of baking by making these variations your own, and create lasting memories with each batch!
Storage Tips for Stained Glass Cookies
Room Temperature: Store your stained glass cookies in a single layer in an airtight container, with parchment paper between layers to avoid sticking, for up to 1 week.
Fridge: If you prefer to store them longer, they can be kept in the fridge for up to 2 weeks, but be sure to bring them to room temperature before serving for optimal texture.
Freezer: Freeze the cookies for up to 3 months in an airtight container; use wax paper to separate layers. Thaw them at room temperature before enjoying.
Reheating: If you want to freshen them up, gently warm individual cookies in the microwave for about 10-15 seconds, just until slightly softened.
Make Ahead Options
These Stained Glass Cookies are perfect for those looking to save time during the busy holiday season! You can prepare the dough up to 3 days in advance, simply wrap it tightly in plastic wrap and refrigerate it. For optimal freshness, chill the dough and skip any rolling or cutting until you're ready to bake. If you're looking to go even further, the baked cookies can be stored in an airtight container for up to a week or frozen for up to 3 months. When it's time to serve, let thaw overnight in the fridge or at room temperature, then sprinkle with powdered sugar and enjoy the vibrant beauty and taste that makes these cookies a festive favorite.
Expert Tips for Stained Glass Cookies
-
Perfect Consistency: Make sure your cookie dough is well-chilled before rolling. This prevents spreading and helps maintain those lovely shapes during baking.
-
Colorful Centers: Use a mix of colored hard candies for a beautiful stained glass effect. Just remember to crush them into small, even pieces for uniform melting.
-
Watch the Bake Time: Keep a close eye on your sugar cookies while they bake. Overbaking can lead to caramelized candy, which may become too dark and lose that vibrant look.
-
Hole Making: Poke holes for hanging while the cookies are still warm. Once cooled, the dough hardens, making it tough to create holes without cracking.
-
Storing Secrets: To keep your stained glass cookies fresh, stack them in an airtight container with parchment paper between layers. They'll stay delicious for up to a week!
These tips will help you create stunning stained glass cookies that are not only tasty but beautifully festive!
Stained Glass Cookies Recipe FAQs
How do I select the right candies for my stained glass cookies?
Absolutely! When choosing candies, it's best to use clear or brightly colored hard candies like Jolly Ranchers or Life Savers. These candies create the most vibrant stained glass effect. Keep in mind to crush them into small, even pieces for uniform melting-this results in flawless, colorful centers that enhance that beautiful cookie aesthetic!
How should I store my stained glass cookies for maximum freshness?
Very good question! To keep your stained glass cookies fresh, store them in a single layer in an airtight container, placing parchment paper between layers to prevent sticking. They can last for up to 1 week at room temperature, but if you want to ensure they stay delicious longer, refrigerate them-where they can stay good for up to 2 weeks. Remember to bring them back to room temperature before serving for that perfect texture!
Can I freeze stained glass cookies, and if so, how?
Yes, indeed! Freezing your stained glass cookies is a fantastic idea! To freeze them, first, cool the cookies completely. Then, place them in an airtight container with wax paper between layers to prevent sticking. They can be frozen for up to 3 months. When you're ready to enjoy them, simply thaw them at room temperature. If you want to freshen them up, a gentle warmth in the microwave for about 10-15 seconds will do the trick!
What if my melted candy centers bubble or caramelize while baking?
Oh no! If your candy centers bubble or caramelize, it could be a sign of overbaking. Make sure to keep a close eye on your cookies as they bake. Ideally, bake them until the edges are golden and the candy is fully melted-this should take about 8-10 minutes. If you notice that the edges are getting too dark, you may want to rotate the tray or lower the oven temperature slightly for even baking.
Are there any dietary considerations I should keep in mind when making these cookies?
Absolutely! When preparing stained glass cookies, it's important to consider any allergies. The recipe contains common allergens such as gluten, dairy, and eggs. For gluten-free versions, substitute the all-purpose flour with a gluten-free flour blend. For dairy-free and vegan options, use a flax egg in place of the large egg and substitute unsalted butter with a plant-based alternative. Always check the candy ingredients for any allergens, especially if you're sharing these treats with others.
Can I customize the flavors of my stained glass cookies?
Oh, very much! Feel free to get creative with your flavorings. While vanilla extract is classic, adding almond extract gives a unique twist that complements the sweet dough beautifully. You could also experiment with other extracts like peppermint for a festive touch, especially around the holiday season. The more the merrier, right? Enjoy personalizing your cookies!
Ultimate Stained Glass Cookies Recipe – A Sweet Holiday Delight!
Equipment
- Mixing Bowl
- Cookie cutter
- baking sheet
- wire rack
- Plastic wrap
Ingredients
For the Cookie Dough
- 2 cups All-Purpose Flour Can substitute with gluten-free blend
- 1 teaspoon Baking Powder Ensure freshness
- ½ teaspoon Salt Fine sea salt recommended
- 1 cup Unsalted Butter Softened
- ¾ cup Granulated Sugar Coconut sugar can be used
- 1 large Egg Can use a flax egg for vegan option
- 1 teaspoon Vanilla Extract Almond extract can be added for flavor
For the Candy Center
- 1 cup Assorted Hard Candies Jolly Ranchers are recommended
For Finishing Touches
- 1 cup Powdered Sugar Optional for dusting
- 1 string Ribbon or String Optional for hanging
Instructions
Instructions
- Cream together softened butter and granulated sugar until light and fluffy, about 2-3 minutes.
- Mix in the large egg, vanilla extract, and optional almond extract until fully incorporated.
- Gradually add all-purpose flour, baking powder, and salt, mixing until just combined.
- Shape the dough into a disk, wrap in plastic wrap, and chill in the refrigerator for at least 1 hour.
- Roll out the chilled dough to ¼-inch thickness, cut out cookie shapes, and create windows with a smaller cutter.
- Transfer to a lined baking sheet and spoon crushed hard candies into each cookie shape.
- Preheat the oven to 350°F (175°C) and bake cookies for 8-10 minutes, until edges are golden.
- Cool on the baking sheet for a few minutes before transferring to a wire rack.
- Dust with powdered sugar if desired and thread ribbon through holes for hanging.
Leave a Reply