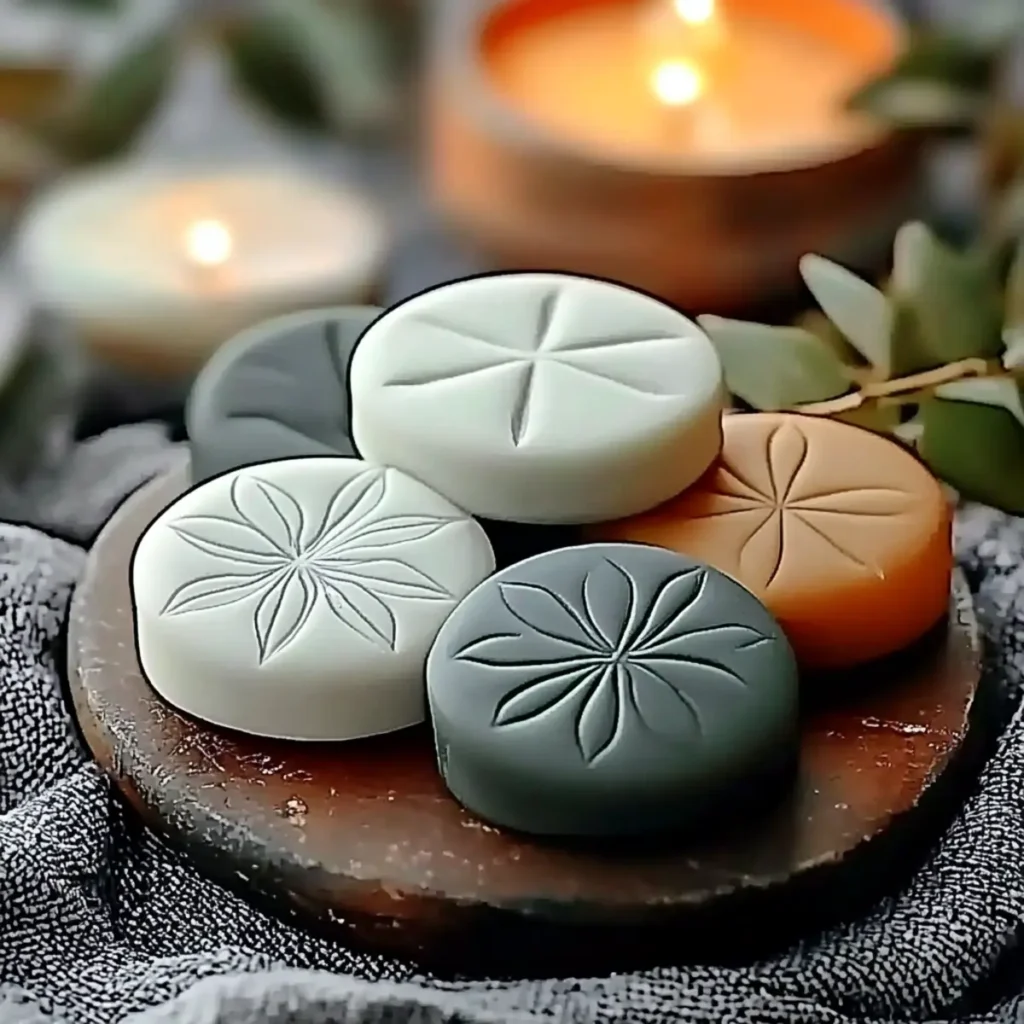
The moment I walked into a friend's home filled with a soothing blend of lavender and eucalyptus, I knew I had to recreate that enchanting atmosphere myself. But instead of reaching for a synthetic air freshener, I decided to embark on a journey of natural scent-making. That's when I discovered the magic of DIY aroma stones! These charming little creations not only perfume your space with delightful fragrances but also act as lovely decorative accents. Best of all, they're incredibly easy to whip up and fully customizable, allowing you to tailor scents to your mood or season. Join me as we explore this eco-friendly alternative to synthetic products and learn how to craft your very own aroma stones. Your home deserves to smell divine!
Why choose DIY Aroma Stones for your home?
Versatile designs: You can create aroma stones in any shape or size, perfectly complementing your decor.
Customizable scents: With endless essential oil combinations, you'll find the perfect fragrance for any room.
Eco-friendly alternative: Ditch the synthetic air fresheners! These stones offer a natural, healthier option for your home.
Simple process: Just mix, mold, and dry - even beginners can master this craft with ease!
Fabulous gift idea: Create a beautiful gift set of aroma stones paired with handmade soaps or bath products for loved ones.
Your home will not only smell fantastic but will also be a reflection of your personal style.
DIY Aroma Stones Ingredients
• Craft your own DIY aroma stones with these simple ingredients!
For the Base Mixture
- Baking Soda - A primary ingredient that helps form the dough for your aroma stones.
- Cornstarch - Provides structure and stability; substitute with arrowroot powder if needed.
- Warm Water - This helps combine the dry ingredients into a workable dough.
For the Fragrance
- Essential Oil (15-30 drops) - Infuse your stones with delightful scents like lavender or lemon; mix oils for customized blends.
- Natural Coloring (optional) - Enhance the visual appeal of your aroma stones, using options like mica powder or food coloring for a personalized touch.
With this straightforward list, you're ready to embark on your aromatic adventure and fill your home with wonderful fragrances through DIY aroma stones!
How to Make DIY Aroma Stones
-
Combine Ingredients: In a mixing bowl, whisk together ½ cup baking soda and ½ cup cornstarch. This creates a solid base for your aroma stones, ensuring they hold their shape beautifully.
-
Add Water Gradually: Slowly pour in ¼ cup warm water while stirring. Continue mixing until the ingredients form a clay-like consistency that is easy to mold.
-
Optional Color: If you desire some color, sprinkle in a pinch of natural coloring. Knead until the mixture is uniform, giving your stones an extra pop of personality!
-
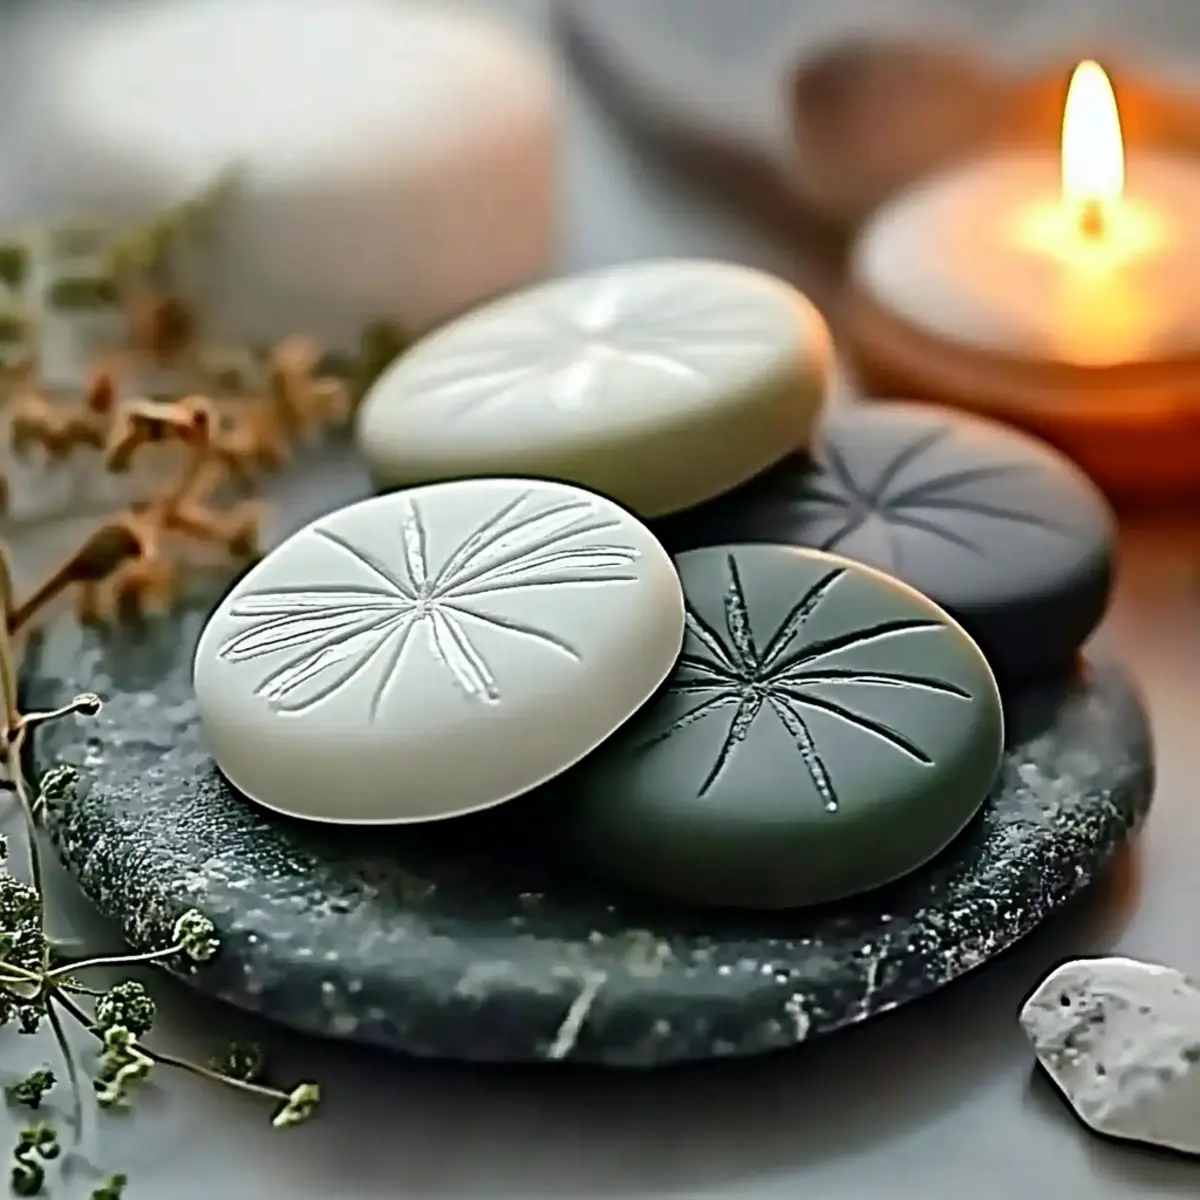
Shape the Mixture: Using silicone molds or cookie cutters, press the dough into various shapes. Have fun with it-create hearts, stars, or even simple rounds!
-
Unmold Carefully: Gently remove the shaped stones and place them on a parchment-lined tray. This helps prevent them from sticking and keeps their lovely designs intact.
-
Dry the Stones: Allow your aroma stones to air-dry for 24-48 hours, flipping them halfway through for even drying. You'll know they're ready when they feel firm yet lightweight.
Optional: For a delightful touch, consider adding dried herbs to the mixture for added texture and fragrance.
Exact quantities are listed in the recipe card below.

How to Store and Freeze DIY Aroma Stones
Airtight Container: Store unused DIY aroma stones in an airtight container to keep their delightful fragrances intact for up to 6 months.
Essential Oil Refresh: Every few weeks, add a few drops of your favorite essential oil to the stones to rejuvenate their scent and ensure they remain aromatic.
Avoid Direct Sunlight: Keep the aroma stones in a cool, dark place to prevent fading and preserve their colors and scents over time.
Gift Preparation: If giving as gifts, consider wrapping each aroma stone in breathable materials to let the scents linger without overwhelming anyone!
Expert Tips for DIY Aroma Stones
• Humidity Awareness: Keep an eye on humidity levels; high humidity can prolong drying time. Utilize a fan if necessary to keep airflow moving.
• Oil Balance: Resist the urge to oversaturate your stones with essential oils, as this can cause them to break down. Stick to the recommended amount for best results.
• Scent Labeling: Create different scent combinations? Remember to label each stone for easy identification, helping your space stay organized and fragrant.
• Mixing Fun: Don't hesitate to experiment with essential oil blends! Try combining floral and citrus oils for a refreshing twist in your DIY aroma stones.
• Storage Strategy: Store any unused aroma stones in airtight containers to preserve their fragrance longer. A couple of drops of essential oil can rejuvenate them anytime!
DIY Aroma Stones Variations
Customize your DIY aroma stones with these delightful twists that elevate your aromatic experience!
-
Dried Herbs: Add lavender, rosemary, or chamomile for a charming look and natural fragrance boost-perfect for a rustic touch!
-
Citrus Zest: Incorporate lemon or orange zest into the mixture for an invigorating citrus scent that brightens your space and spirit.
-
Floral Infusions: Mix in dried rose petals or calendula flowers for a lovely visual element and a gentle, soothing aroma-ideal for relaxation.
-
Texture Finish: Experiment with sand or small pebbles in the mixture to create a unique texture that adds an earthy element to your stones.
-
Layered Scents: Create multiple layers in your stones by allowing the first layer to dry before adding another scented layer-imagine a surprise fragrance!
-
Essential Oil Blends: Combine oils like eucalyptus with peppermint for a refreshing twist, or lavender with cedarwood for a calming, earthy vibe.
-
Scent Beads: For a fun touch, incorporate aroma beads that will infuse even more fragrance as the stones dry-this is pure olfactory ingenuity!
-
Seasonal Scent Variations: Change your essential oils with the seasons-think cinnamon and clove for winter or floral notes for spring-keeping your home festive year-round!
What to Serve with DIY Aroma Stones?
Infuse your space with blissful scents while personalizing your decor with these delightful aroma stones!
- Charming Gift Sets: Pair aroma stones with handmade soaps or candles for a thoughtful gift, creating a serene atmosphere for your loved ones.
- Beautifully Styled Trays: Display your aroma stones on decorative trays with flowers or succulents, adding a touch of natural elegance to any room.
- Scented Herbal Sachets: For an additional layer of fragrance, consider incorporating herbal sachets filled with dried lavender or rosemary to complement the aroma stones.
- Aromatherapy Candles: Enhance the atmosphere with candles scented similar to your aroma stones, creating a harmonious blend of fragrances that envelops your home.
- Infused Potpourri Bowls: Use bowls of potpourri alongside your aroma stones for a multi-layered scent experience, merging textures and scents beautifully.
- Customized Air Fresheners: Add drops of essential oils to your homemade air fresheners, featuring scents that echo those in your aroma stones for a cohesive smell throughout your space.
- Inviting Bath Rituals: Create a fragrant bathing experience by pairing aroma stones with bath bombs or salts that share the same calming aromas.
- Refreshing Beverages: Enjoy a glass of herbal iced tea or floral-infused lemonade to sip on while basking in the delightful scents of your DIY aroma stones.
- Calming Smoothies: Whip up a refreshing smoothie with citrus or berry flavors that complement fruity essential oils, elevating both taste and scent in your home.
Make Ahead Options
Crafting DIY aroma stones can truly enhance your home ambiance, and the good news is that you can prepare many components ahead of time! You can mix the dry ingredients (½ cup baking soda and ½ cup cornstarch) and store them in an airtight container for up to 3 days. When you're ready to create your aroma stones, simply add the warm water and essential oils, knead the dough, and shape it. To maintain the stones' quality while preparing in advance, avoid adding the essential oils until you're approximately ready to mold the stones, as this will help preserve the fragrance. After shaping, let them air dry for 24-48 hours, and you'll have delightful DIY aroma stones ready to scent your space with charm and tranquility!

DIY Aroma Stones Recipe FAQs
How do I choose the right essential oils for my aroma stones?
Absolutely! Selecting essential oils depends on your personal preferences and the mood you want to create. For a calming atmosphere, consider lavender or chamomile. If you're looking for a fresh scent, citrus oils like lemon or orange are fantastic choices. Don't hesitate to mix different oils for a unique blend that expresses your style!
How should I store my DIY aroma stones?
To keep your DIY aroma stones fresh, store them in an airtight container. This will maintain their delightful fragrances for up to 6 months. I recommend placing a few drops of your favorite essential oil on the stones every couple of weeks for a scent refresh. Remember to keep them away from direct sunlight to protect their colors and scents.
How can I prevent my aroma stones from breaking during drying?
Very! One helpful tip is to ensure that your mixture has the right consistency - not too wet and not too dry. If you're experiencing high humidity, it may prolong drying time. To solve this, consider using a fan or placing your stones in a low-humidity environment. Flipping the stones halfway through the drying time also helps achieve an even texture and firmness.
Can I freeze my aroma stones?
While not necessary, you can freeze your aroma stones if you want to store them longer. To do this, place them in a airtight container and make sure they are well-protected from moisture. They should retain their fragrance for up to 3 months. When you're ready to use them again, simply allow them to thaw at room temperature before placing them around your home.
Are the ingredients in aroma stones safe for pets?
Yes, the ingredients in DIY aroma stones are generally safe for pets. However, it's essential to ensure that your chosen essential oils are safe for animals, as some can be harmful. Oils like lavender and chamomile are considered safe in moderation, but always check with your veterinarian if you're unsure. Also, keep the stones out of reach of curious pets.

DIY Aroma Stones: The Best Natural Way to Scent Your Space
Equipment
- Mixing Bowl
- silicone molds
- Parchment Paper
Ingredients
For the Base Mixture
- 0.5 cups baking soda A primary ingredient for forming the dough.
- 0.5 cups cornstarch Provides structure and stability.
- 0.25 cups warm water Helps combine the dry ingredients.
For the Fragrance
- 15-30 drops essential oil Infuse stones with scents like lavender or lemon.
- natural coloring Optional for visual appeal.
Instructions
How to Make DIY Aroma Stones
- Combine Ingredients: In a mixing bowl, whisk together ½ cup baking soda and ½ cup cornstarch.
- Add Water Gradually: Slowly pour in ¼ cup warm water while stirring, mixing until a clay-like consistency is achieved.
- Optional Color: If desired, sprinkle in a pinch of natural coloring and knead until uniform.
- Shape the Mixture: Using molds or cookie cutters, press the dough into shapes.
- Unmold Carefully: Gently remove shaped stones and place on a parchment-lined tray.
- Dry the Stones: Allow to air-dry for 24–48 hours, flipping halfway through.


Leave a Reply