
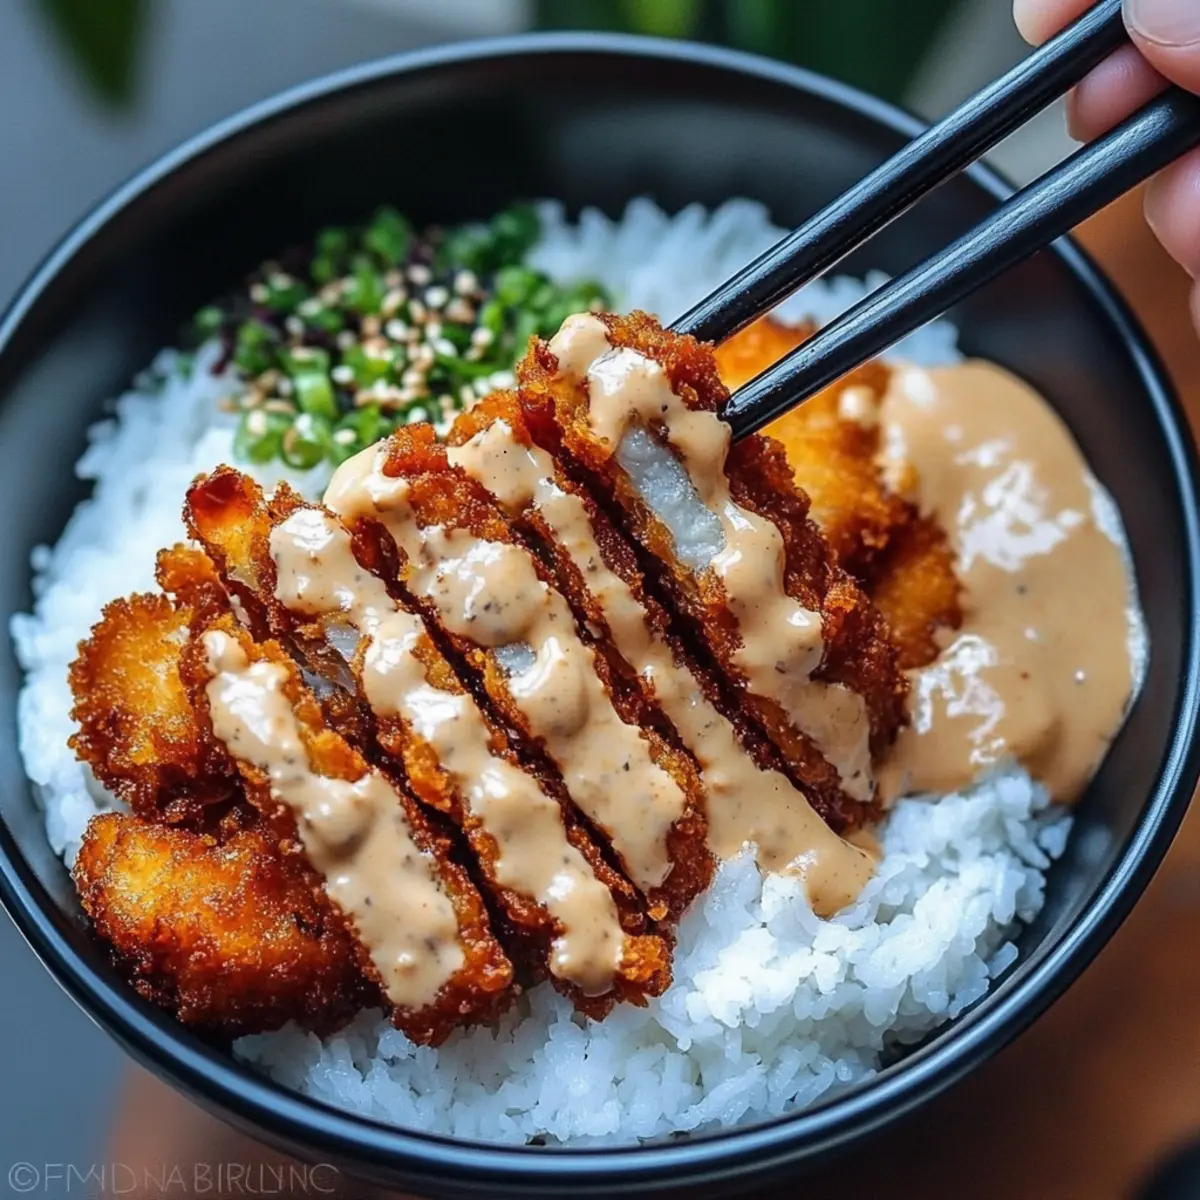
As the evenings grow cooler, there's nothing quite like the welcome embrace of home-cooked comfort food. Picture this: a fragrant bowl brimming with crispy, golden panko-breaded cutlets perched atop a fluffy bed of white rice, all drizzled with a rich, tangy tonkatsu sauce. This Japanese Katsu Bowl isn't just a meal; it's a love letter to all who crave warmth and satisfaction after a long day.
I first whipped up this mouthwatering dish on a weeknight when fast food felt like the only option after a hectic day. In just a few simple steps, I transformed humble ingredients into an indulgent feast that pleased the entire family. Each bite delivers that unforgettable crunch, complemented by savory-sweet flavors that make you forget about takeout. And the best part? You can easily customize it for gluten-free diets or even switch out the proteins! Let's dive into the irresistible world of Japanese Katsu Bowls with Tonkatsu Sauce-your new favorite weeknight companion.
Why are Japanese Katsu Bowls with Tonkatsu Sauce so irresistible?
Comforting and Satisfying: Each bowl is a hug in food form, featuring crunchy cutlets that perfectly contrast fluffy rice.
Quick and Easy: Ready in under an hour, it's ideal for busy weeknights.
Flavor Explosion: The sweet and tangy tonkatsu sauce elevates the crispy cutlets, making each bite a delight.
Customizable: Whether you prefer chicken, pork, or tofu, this dish adapts to your cravings and dietary needs.
Crowd-Pleaser: Perfect for family dinners or gatherings, it invites everyone to dig in and enjoy! Spice up your table by checking out my guide on perfect weeknight meals.
Japanese Katsu Bowls Ingredients
• To create the most delightful Japanese Katsu Bowls with Tonkatsu Sauce, gather these essential ingredients for a satisfying meal.
For the Cutlets
- Chicken or Pork Cutlets - Choose your favorite protein, pounded to ½ inch thickness for optimal cook time.
- Salt and Pepper - Essential for seasoning; adjust to suit your taste.
For the Breading
- Flour - This forms the base for dredging; you can use gluten-free flour for a gluten-free option.
- Eggs - Whisked to bind the breadcrumbs to the cutlets effectively.
- Panko Breadcrumbs - Offers that signature crispy coating; opt for gluten-free panko if needed.
For Frying
- Oil - A neutral oil like vegetable or canola is perfect for frying to golden perfection.
For the Tonkatsu Sauce
- Ketchup - Adds a sweet and tangy base for the sauce.
- Worcestershire Sauce - Generates depth and complexity; no substitutes suggested.
- Soy Sauce - Provides umami; tamari can be used as a gluten-free alternative.
- Sugar - Balances the sauce's acidity; adjust to your cravings.
For Serving
- Steamed White Rice - The fluffy base of the bowl; consider brown rice for a healthier twist.
- Fresh Parsley or Green Onions - Optional garnishes to brighten up your dish and add color.
Craft your Japanese Katsu Bowls with Tonkatsu Sauce using these ingredients, and enjoy a meal that brings smiles to your family's faces!
How to Make Japanese Katsu Bowls
-
Prepare Cutlets: Pound your chicken or pork to a uniform ½-inch thickness. This ensures even cooking, so season with salt and pepper to enhance those delightful flavors.
-
Breading Station: Create your assembly line! Set up three bowls: one with flour, another with beaten eggs, and the last with panko breadcrumbs. This will make the breading process a breeze!
-
Bread Cutlets: Take each cutlet and coat it in flour first, then dip it in the egg mixture, and finally cover it with panko. Press the breadcrumbs gently to ensure they stick well, creating that irresistible crunch.
-
Fry Cutlets: Heat oil in a large pan over medium-high heat until shimmering (around 350°F or 175°C). Test with a breadcrumb; if it sizzles, you're ready! Fry cutlets for 3-4 minutes on each side until they are golden brown and cooked through (165°F/74°C for chicken; 145°F/63°C for pork). Drain on paper towels to remove excess oil.
-
Make Tonkatsu Sauce: In a bowl, mix together ketchup, Worcestershire sauce, soy sauce, and sugar until well combined. Taste and adjust the sweetness according to your preference-this sauce should be a perfect balance of tangy and sweet!
-
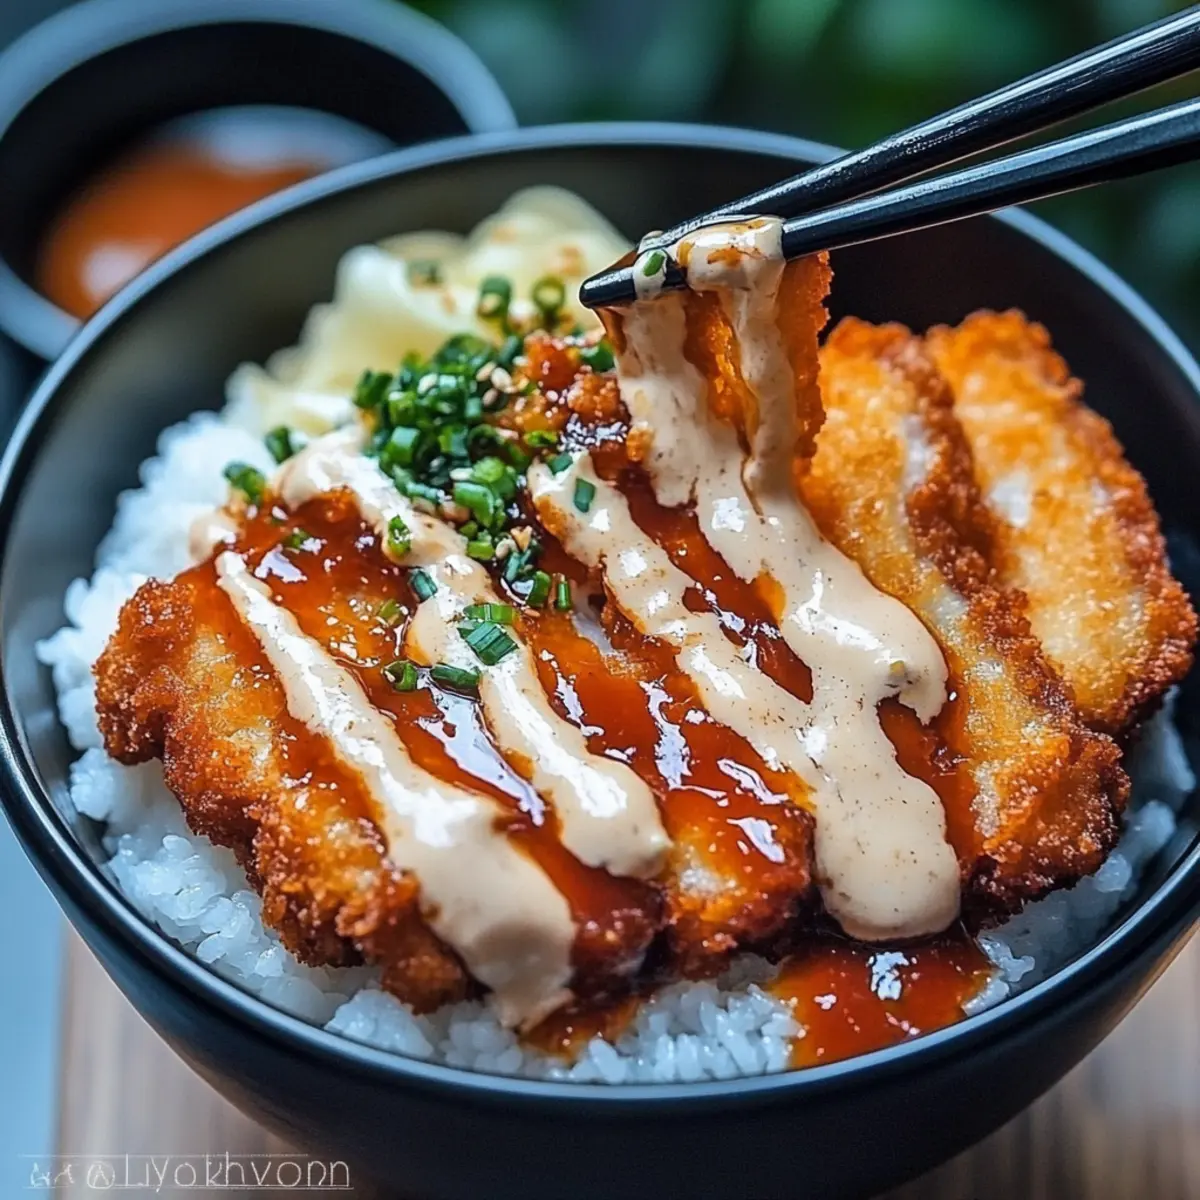
Assemble Bowls: Start with a hearty scoop of fluffy steamed rice in your bowl. Slice the crispy cutlets and place them on the rice, then generously drizzle with your tonkatsu sauce. Garnish with fresh parsley or green onions for a pop of color and flavor!
-
Serve Immediately: Enjoy your Japanese Katsu Bowl while it's hot and fresh for that ultimate crunch and flavor experience.
Optional: Add a sprinkle of sesame seeds for extra texture and flavor!
Exact quantities are listed in the recipe card below.

Storage Tips for Japanese Katsu Bowls with Tonkatsu Sauce
-
Fridge: Store any leftover katsu and rice separately in airtight containers. Katsu keeps well for up to 3 days, while rice can last around the same time.
-
Freezer: If you want to save katsu for later, freeze the cutlets on a baking sheet before transferring to an airtight container. They'll maintain quality for up to 2 months.
-
Reheating: To keep katsu crispy, reheat in an oven at 350°F (175°C) for about 10-15 minutes. Add a splash of water to the rice before microwaving to restore fluffiness.
-
Avoid Sogginess: Never store katsu on top of rice, as the moisture can make the coating soggy. Keep them separate for the best texture when enjoying your Japanese Katsu Bowls!
Expert Tips for Japanese Katsu Bowls
-
Oil Temperature: Ensure oil reaches about 350°F (175°C) before frying; this prevents cutlets from becoming soggy and promotes a crispy finish.
-
Avoid Overcrowding: Fry cutlets in batches; overcrowding the pan lowers the oil temperature and leads to uneven cooking.
-
Flour and Egg Coating: Be sure to fully coat each cutlet in flour first, followed by egg, then panko. This layering enhances the crispy texture of your Japanese Katsu Bowls.
-
Resting Time: Let cooked cutlets rest on paper towels for a minute before slicing. This step helps retain their crunch by absorbing excess oil.
-
Customize Your Sauce: Adjust the tonkatsu sauce sweetness to your liking; consider adding a dash of hot sauce for a spicy kick!
What to Serve with Japanese Katsu Bowls with Tonkatsu Sauce?
Nothing completes a delightful meal quite like the right pairings, bringing balance and flavor to your Japanese Katsu Bowls with Tonkatsu Sauce.
-
Miso Soup: This warm, savory soup enhances the comforting vibe of your meal, perfect for sipping alongside your katsu bowl.
-
Cucumber Salad: Crisp, refreshing, and lightly dressed, it adds a wonderful contrast to the richness of the katsu and rice.
-
Pickled Vegetables: A tangy side that sharpens every bite with their crunch and acidity, balancing the savory-sweet flavors.
-
Steamed Edamame: A mild and nutty snack, they provide a fun finger food element that also packs in more protein.
-
Fried Egg: A silky fried egg on top adds richness and a beautiful presentation; break the yolk for added sauciness!
-
Jasmine Rice: If you're looking for something with a floral note, jasmine rice offers a fragrant twist to absorb all that delicious tonkatsu sauce.
Enjoying these sides not only turns your meal into an experience but also heightens the comforting nature of the Japanese Katsu Bowls, leaving everyone at the table satisfied and eager for more!
Make Ahead Options
These Japanese Katsu Bowls with Tonkatsu Sauce are perfect for busy home cooks looking to save time during the week! You can bread and fry the cutlets up to 24 hours in advance; simply allow them to cool completely before storing in an airtight container in the refrigerator to maintain their crispiness. The tonkatsu sauce can also be prepared ahead of time-just refrigerate it for up to 3 days in a sealed jar. When you're ready to serve, reheat the cutlets in a hot oven to regain their crunch for about 10 minutes. Assemble your bowls with steamed rice and a drizzle of the sauce for a delicious, quick meal that's just as satisfying as when it's freshly made!
Japanese Katsu Bowls Variations
Ready to put your own twist on these delightful bowls? Let your creativity shine with these simple adjustments!
-
Gluten-Free: Use gluten-free flour and panko breadcrumbs for a crispy, gluten-free delight.
-
Protein Swap: Substitute chicken cutlets with tender pork or crispy tofu for a vegetarian version.
-
Rice Options: Experience different textures by swapping white rice for brown rice or even quinoa.
-
Flavor Boost: Add a teaspoon of sesame oil to the tonkatsu sauce for a nutty fragrance that elevates the dish.
-
Spicy Kick: Mix in a splash of sriracha to the tonkatsu sauce for a zesty twist that tantalizes the taste buds.
-
Tropical Twist: Toss in some pineapple chunks with the rice for a sweet and tangy fusion of flavors.
-
Extra Toppings: Enhance your katsu bowl with toppings like pickled ginger, a runny fried egg, or fresh avocado slices.
-
Veggie Medley: Complement your dish with sautéed vegetables like bell peppers or bok choy, adding crunch and nutrition to every bite.
Feel the freedom to experiment, and craft a bowl that truly satisfies your cravings!
Japanese Katsu Bowls with Tonkatsu Sauce Recipe FAQs
What type of cutlets should I use for Japanese Katsu Bowls?
You can use either chicken or pork cutlets for your Japanese Katsu Bowls. Make sure to pound them to ½ inch thickness for even cooking. This not only helps them cook faster but also ensures a tender bite that pairs beautifully with the crunchy exterior.
How should I store leftover katsu and rice?
To store leftovers properly, keep the katsu and rice in separate airtight containers in the fridge. This will prevent the katsu from getting soggy. Consume within 3 days for the best flavor and freshness. You can easily reheat the rice in the microwave, adding a splash of water to restore its fluffiness.
Can I freeze katsu cutlets?
Absolutely! To freeze your cutlets, lay them out on a baking sheet in a single layer and place in the freezer until solid. Then, transfer them to an airtight container or freezer bag. They can remain frozen for up to 2 months. When you're ready to enjoy, thaw them overnight in the fridge and reheat them in the oven for that perfect crunch.
What if my katsu cutlets aren't crispy enough?
If your katsu cutlets turn out soggy rather than crispy, it might be that the oil wasn't hot enough during frying. Make sure the oil reaches at least 350°F (175°C) before you start frying. Also, don't overcrowd the pan, as that can lower the oil temperature drastically and lead to uneven cooking. Fry in batches for the best result!
Can I make Japanese Katsu Bowls gluten-free?
Yes! To create a gluten-free version of Japanese Katsu Bowls with Tonkatsu Sauce, simply substitute regular flour and panko breadcrumbs with gluten-free alternatives. You can use gluten-free flour for dredging and gluten-free panko for the perfect crispy coating. Also, tamari can be used in place of soy sauce without sacrificing flavor.
How long can I keep the tonkatsu sauce?
Your homemade tonkatsu sauce can be stored in an airtight container in the refrigerator for up to a week. If you want to make a larger batch, it also freezes well! Just portion it out and use within 3 months for the best taste.

Irresistibly Crispy Japanese Katsu Bowls with Tonkatsu Sauce
Equipment
- large pan
- three bowls for breading
- whisk
- meat mallet
Ingredients
For the Cutlets
- 2 pieces Chicken or Pork Cutlets Pounded to ½ inch thickness
- to taste Salt
- to taste Pepper
For the Breading
- 1 cup Flour Can substitute with gluten-free flour
- 2 pieces Eggs Whisked
- 1 cup Panko Breadcrumbs Opt for gluten-free panko if needed
For Frying
- oil Neutral Oil Vegetable or canola recommended
For the Tonkatsu Sauce
- ½ cup Ketchup
- 2 tablespoons Worcestershire Sauce
- 2 tablespoons Soy Sauce Tamari can be used for gluten-free
- 1 tablespoon Sugar Adjust to taste
For Serving
- 4 cups Steamed White Rice Consider brown rice for a healthier option
- to taste Fresh Parsley or Green Onions Optional garnishes
Instructions
Instructions
- Pound your chicken or pork to a uniform ½-inch thickness. Season with salt and pepper.
- Set up three bowls for breading: one with flour, one with beaten eggs, and one with panko breadcrumbs.
- Coat each cutlet in flour, dip in the egg mixture, and then cover with panko breadcrumbs.
- Heat oil in a pan over medium-high heat. Fry cutlets for 3-4 minutes on each side until golden brown and cooked through.
- Mix together ketchup, Worcestershire sauce, soy sauce, and sugar to create the tonkatsu sauce. Adjust sweetness to preference.
- Assemble the bowls with steamed rice, sliced cutlets, and drizzle with tonkatsu sauce. Garnish with parsley or green onions.
- Serve immediately while hot for the best crunch and flavor experience.
Leave a Reply