
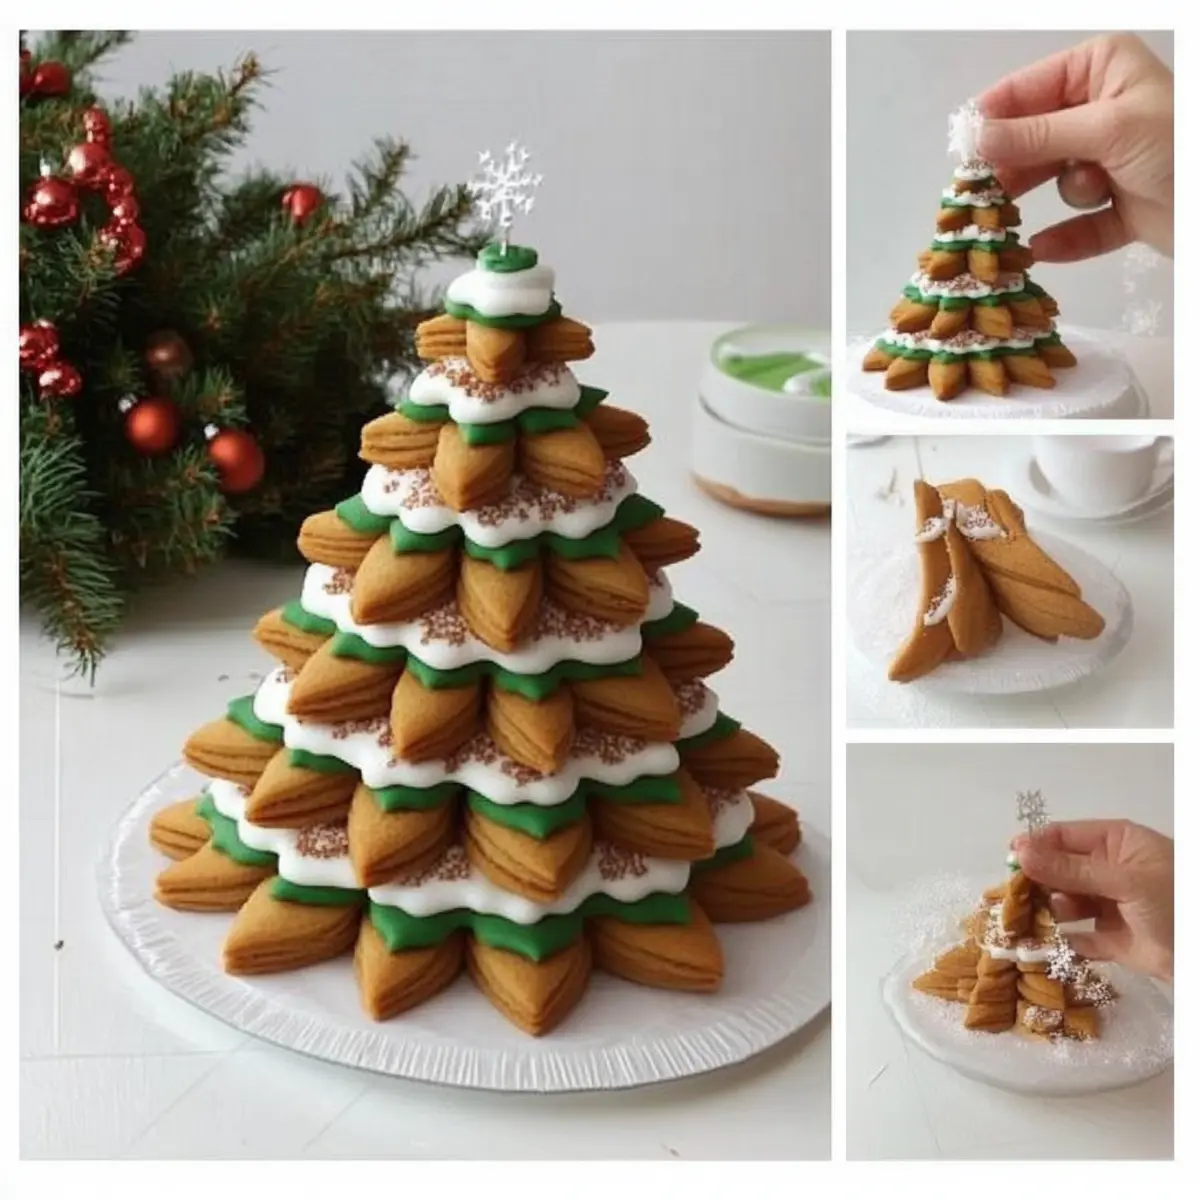
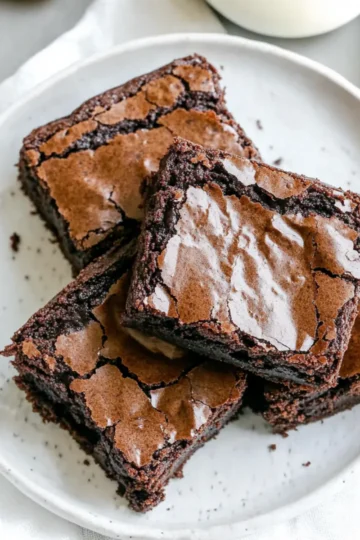
Every holiday season, a flurry of creativity fills my kitchen, turning ordinary baking into festive fun. This year, I couldn't resist the allure of crafting 3D Cookie Christmas Trees-these delightful confections not only satisfy our sweet tooth but also add a charming touch to our holiday decor. Picture a colorful tower of sugar cookie trees, each one lovingly adorned with royal icing and sprinkles, creating a centerpiece that will steal the show at your festive gatherings.
Imagine inviting family and friends to join in the decorating process, turning a simple baking activity into a joyous celebration. These cookies are perfect for gifting too, making them an edible delight sure to warm hearts and spread holiday cheer. Best of all, I'm here to guide you through every step of the process with this DIY tutorial. So roll up your sleeves, gather your ingredients, and let's create some unforgettable holiday memories with these adorable 3D Cookie Christmas Trees!

Why Is This Christmas Recipe So Special?
Unique Creation: Transform your holiday baking into a memorable experience with these whimsical 3D Cookie Christmas Trees.
Engaging Activity: Invite loved ones to join the fun, fostering togetherness during the festive season.
Visually Stunning: Each cookie tree becomes a delightful centerpiece, captivating guests with its colorful icing and decorations.
Thoughtful Gifts: Packaged beautifully, these cookies make heartfelt, edible gifts that spread cheer.
Festive Fun: Whether for crafting or gifting, this recipe brings the joy of creativity to your kitchen.
Embrace the holiday spirit with this DIY tutorial, which ensures a delightful baking adventure for everyone!
Christmas Recipe: 3D Cookie Christmas Tree Ingredients
For the Sugar Cookies
• Sugar - Adds the sweet base flavor for your delightful cookie trees.
• Butter - Ensures a rich, tender texture; use unsalted for precise control over sweetness.
• Eggs - Binds the ingredients together, giving structure to your sugar cookies.
• Flour - Forms the main bulk of the dough; all-purpose flour works beautifully.
• Baking Powder - Helps cookies rise slightly, making them fluffy rather than too dense.
For the Royal Icing
• Powdered Sugar - Sweetens and thickens the icing for easy decorating.
• Egg Whites or Meringue Powder - Creates a stable icing that hardens well; essential for stacking cookies.
• Water - Adjusts the icing's consistency for piping details or flooding surfaces.
For Decorating
• Food Coloring - Gel colors work best for vibrant, vivid hues in your icing.
• Sprinkles - These bring a festive touch; consider colorful nonpareils or themed options for variety.
• Edible Glitter - Adds an elegant sparkle; a lovely touch for a more sophisticated look.
For Assembly
• Cardboard or Parchment - Use these sturdy bases to support your stacked cookies as they dry and set.
Get ready to dive into this cheerful Christmas recipe, and let your creativity flourish while making these 3D Cookie Christmas Trees!
How to Make 3D Cookie Christmas Trees
-
Prepare the Dough: In a large bowl, mix your sugar, butter, eggs, flour, and baking powder until a smooth dough forms. Chill the mixture in the refrigerator for at least 1 hour for easier handling.
-
Cut Cookies: Roll out the chilled dough on a floured surface to about ¼ inch thick. Use cookie cutters to create tree shapes, ensuring you have enough pieces for stacking.
-
Bake: Preheat your oven to 350°F (175°C). Arrange the shaped cookies on lined baking sheets and bake for 8-10 minutes, or until the edges are lightly golden.
-
Cool Cookies: Once baked, remove the cookies from the oven and let them cool on wire racks completely before decorating.
-
Prepare Icing: In a bowl, combine powdered sugar, egg whites (or meringue powder), and a little water. Mix until you reach a thick consistency suitable for piping.
-
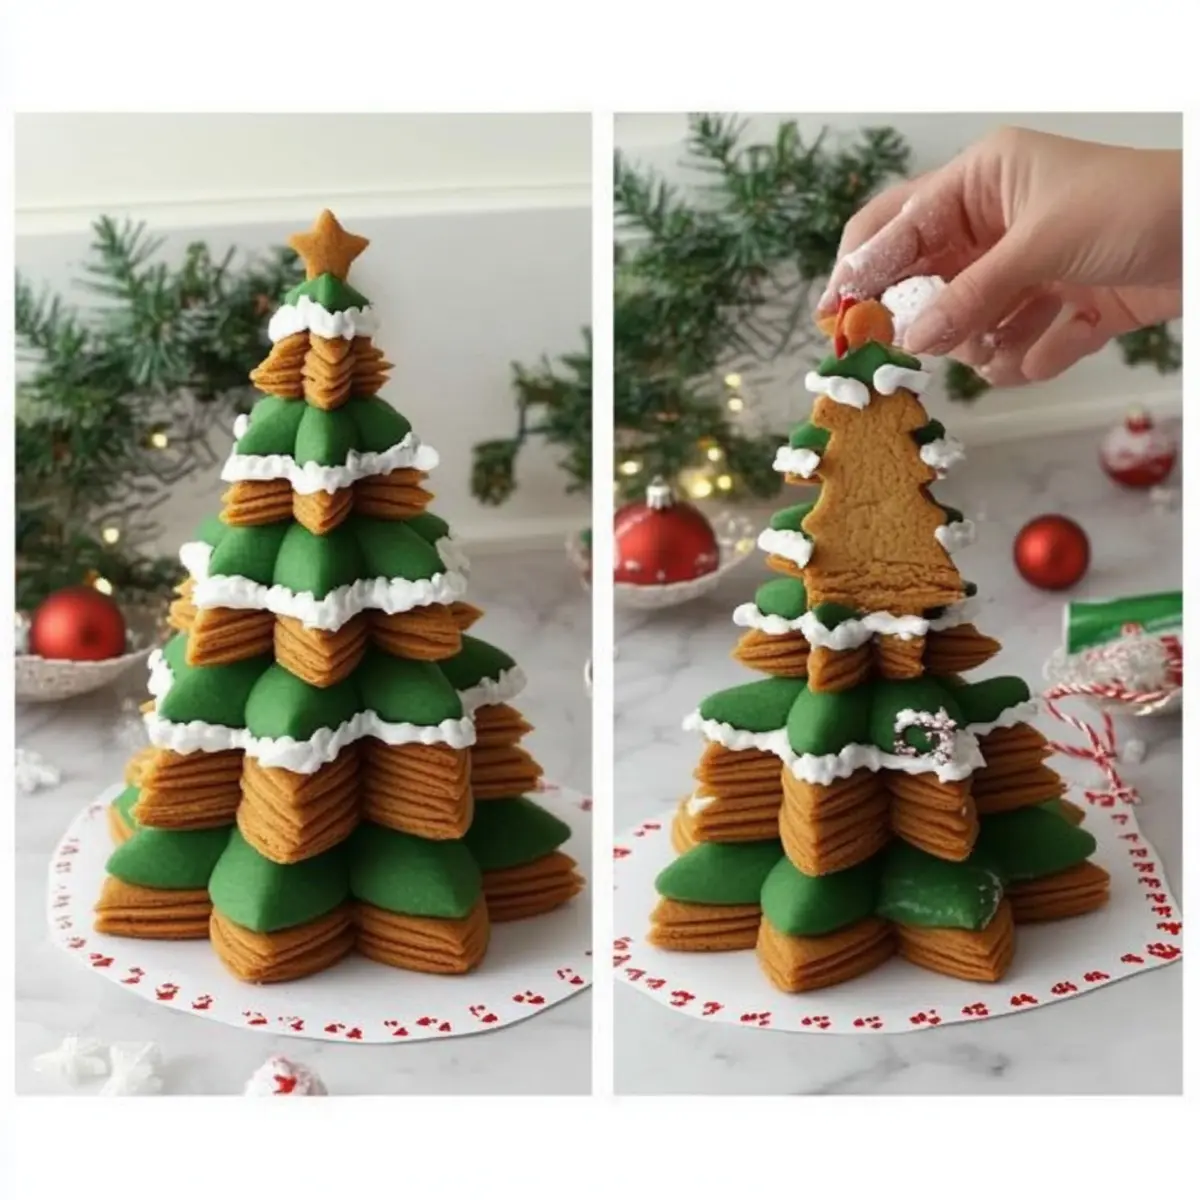
Assemble Trees: Carefully stack the cooled cookies with a generous layer of royal icing between each cookie to hold them together securely.
-
Decorate: Use the prepared icing to enhance your cookie trees. Swirl, pipe, and sprinkle to create festive designs and colors for your trees.
-
Final Touches: Allow the decorated trees to set at room temperature for at least 2 hours, ensuring the icing is completely hardened before serving or gifting.
Optional: Drizzle some melted chocolate over the trees for an extra indulgent touch.
Exact quantities are listed in the recipe card below.
What to Serve with 3D Cookie Christmas Trees?
Transform your holiday gatherings into a festive feast with delightful pairings that accentuate these charming cookies.
- Hot Cocoa Bar: Serve with rich hot cocoa, flavored with peppermint or marshmallows, to create a cozy atmosphere.
- Festive Cheese Platter: Complement the sweetness with a cheese selection, offering a savory contrast to the cookies' sugary delight.
- Spiced Chai Latte: This warm and aromatic drink enhances the sweet and spicy notes of the holiday season.
- Fruit Platter: Fresh fruit like strawberries and clementines adds a refreshing touch to balance the sweetness of the cookies.
- Nuts and Dried Fruits: Provide a varied texture and savory flavor that elevates the entire dessert experience.
- Eggnog: A classic holiday beverage that pairs beautifully with cookies, bringing nostalgia and warmth to your table.
- Gingerbread Cookies: Continue the festive spirit with these traditional treats, offering a different flavor but a similar vibe.
- Decorated Cupcakes: Colorful and festive, these cupcakes make a beautiful addition to your dessert spread.
- Milk: Simple yet classic, a glass of cold milk is perfect for dipping and enjoying alongside these sweet trees.
- Sugar Cookie Icing: Offer a small bowl of leftover icing for guests who want to add their touch to the cookies or other treats.
How to Store and Freeze 3D Cookie Christmas Trees
- Room Temperature: Store cookies in a cool, dry place in an airtight container for up to 1 week to maintain their crispness and freshness.
- Fridge: If you live in a warmer climate, consider refrigerating the cookies in a sealed container for up to 2 weeks, though this may slightly alter the texture.
- Freezer: For longer storage, these delightful treats can be frozen for up to 3 months. Wrap each cookie individually and place in an airtight freezer bag.
- Reheating: When ready to enjoy, allow the cookies to thaw at room temperature for a few hours. If you'd like to freshen them up, warm briefly in the oven at 300°F (150°C) for 5-7 minutes.
Christmas Recipe Variations & Substitutions
Feel free to get creative with these delicious twists and adjustments for your festive cookie trees-they're all about having fun in the kitchen!
- Gluten-Free: Use a gluten-free flour blend to make a celiac-friendly version without sacrificing flavor.
- Vegan: Substitute eggs with flaxseed meal and use vegan butter for an animal product-free treat.
- Chocolate Trees: Incorporate cocoa powder into the dough for rich chocolate-flavored cookies; a holiday favorite!
- Spiced Version: Add cinnamon and nutmeg to the dough for a warm, spiced aroma that invokes holiday cheer.
- Nutty Surprise: Mix in some finely chopped nuts like almonds or walnuts for a delightful crunch and unexpected texture.
- Fruity Flavors: Add zest from oranges or lemons to your dough for a refreshing citrus touch that brightens each bite.
- Savory Twist: Experiment with herb-infused dough, like rosemary or thyme, for a unique savory cookie that will wow guests.
- Layered Icing: Use fondant in addition to royal icing for a smooth, artisan look; it's perfect for those who love crafting!
Transform your holiday baking with these delightful variations and make your 3D Cookie Christmas Trees truly your own!
Expert Tips for 3D Cookie Christmas Trees
-
Chill the Dough: Allowing the dough to chill significantly helps prevent spreading during baking, ensuring your 3D cookies maintain their shape.
-
Use a Sturdy Base: Always use sturdy cardboard or parchment under your cookies to prevent collapsing; this makes stacking layers much easier.
-
Piping Precision: Opt for a piping bag when decorating for a more professional finish-using it helps create clean lines and intricate designs.
-
Icing Consistency Matters: Aim for a thick royal icing for stacking, but make sure it's still smooth enough for piping. Test its consistency before using.
-
Cool Completely: Never rush the cooling process; icing will melt if applied to warm cookies, leaving your finished product less appealing.
Embrace these tips to master your Christmas recipe and create beautiful 3D Cookie Christmas Trees that will undoubtedly impress!
Make Ahead Options
These 3D Cookie Christmas Trees are perfect for busy home cooks who want to save time during the festive season! You can prepare the cookie dough up to 24 hours in advance; simply chill it in the refrigerator to maintain freshness. Additionally, the baked cookies can be stored in an airtight container for up to 3 days before decorating. When you're ready to build your trees, remember to let the cookies come to room temperature, which helps with icing application. For the royal icing, prepare it the night before to allow it to firm up; just re-whip the icing slightly before using it. These make-ahead tips ensure that your 3D Cookie Christmas Trees are just as delightful and festive, ready to impress your holiday guests with minimal last-minute effort!
3D Cookie Christmas Tree Recipe FAQs
How do I select ripe ingredients for my cookies?
Absolutely! For your sugar cookies, ensure that your butter is at room temperature for easy creaming with sugar, resulting in a light texture. Fresh eggs help create the perfect structure, while flour should be pest-free and fresh to maintain good dough consistency.
What are the best storage methods for my decorated cookies?
To keep your adorable 3D Cookie Christmas Trees fresh, store them in a cool, dry place in an airtight container for up to 1 week. If your home is warmer, refrigeration in a sealed container can help for up to 2 weeks, but this may slightly change the texture.
Can I freeze my 3D Cookie Christmas Trees?
Yes! For longer storage, you can freeze these delightful treats for up to 3 months. Make sure to wrap each cookie individually in plastic wrap and then place them in an airtight freezer bag. When you're ready to enjoy them, simply thaw at room temperature for a few hours or warm them briefly in the oven at 300°F (150°C) for 5-7 minutes.
What should I do if my icing is too runny for decorating?
Very! If your royal icing is too runny, simply add more powdered sugar until you achieve the right thickness for piping. Ideally, it should hold its shape but still be smooth enough for detailed designs. You can test the consistency by piping a small amount-if it holds its shape, you're good to go!
Are there any dietary considerations for my 3D Cookie Christmas Trees?
Of course! If you're concerned about allergies, keep in mind that this recipe contains common allergens like eggs, gluten, and dairy. For egg-free alternatives, consider using aquafaba or a commercial egg replacer in the royal icing. Always be sure to check product labels for gluten-free flour and substitute as needed to accommodate dietary restrictions.
How long will it take for the icing to set before packaging the cookies?
Wonderful question! The icing needs to set completely at room temperature for at least 2 hours. Ensuring the icing is thoroughly hardened prevents any smudging when you package them as gifts. Patience is key to achieving that perfect finish!

Craft Your Best Christmas Recipe: 3D Cookie Christmas Tree DIY
Equipment
- Mixing Bowl
- Cookie cutters
- Baking sheets
- wire rack
- Piping bag
Ingredients
For the Sugar Cookies
- 1 cup Sugar
- 1 cup Butter unsalted
- 1 large Eggs
- 3 cups Flour all-purpose
- 1 teaspoon Baking Powder
For the Royal Icing
- 4 cups Powdered Sugar
- 3 tablespoons Egg Whites or Meringue Powder
- 1-2 tablespoons Water to adjust consistency
For Decorating
- as needed Food Coloring gel colors recommended
- as needed Sprinkles colorful nonpareils or themed options
- as needed Edible Glitter
For Assembly
- as needed Cardboard or Parchment
Instructions
Making the Cookies
- In a large bowl, mix your sugar, butter, eggs, flour, and baking powder until a smooth dough forms. Chill the mixture in the refrigerator for at least 1 hour for easier handling.
- Roll out the chilled dough on a floured surface to about ¼ inch thick. Use cookie cutters to create tree shapes, ensuring you have enough pieces for stacking.
- Preheat your oven to 350°F (175°C). Arrange the shaped cookies on lined baking sheets and bake for 8-10 minutes, or until the edges are lightly golden.
- Once baked, remove the cookies from the oven and let them cool on wire racks completely before decorating.
Preparing the Icing and Decorating
- In a bowl, combine powdered sugar, egg whites (or meringue powder), and a little water. Mix until you reach a thick consistency suitable for piping.
- Carefully stack the cooled cookies with a generous layer of royal icing between each cookie to hold them together securely.
- Use the prepared icing to enhance your cookie trees. Swirl, pipe, and sprinkle to create festive designs and colors for your trees.
- Allow the decorated trees to set at room temperature for at least 2 hours, ensuring the icing is completely hardened before serving or gifting.

Leave a Reply